

April 11th, 2024, posted in learning
by Adelina
This week we had a client who wanted his Laravel web app in Google App Engine. There were multiple reasons for this:
- cost (reported to be cheaper than Amazon)
- multi region
- autoscaling
Plus, we already use a lot of Google APIs in this particular app, so it seemed a pretty easy job to do. Well it wasn’t easy, but I certainly made it work.
Going through this experience, I found the hard way that there's hardly any information on this topic. And the only tutorial I was able to find was posted on the Google community and it was missing a lot of details.
Before starting:
I recommend before starting your journey of deploying a Laravel app with Google App Engine to read this entire article. Get everything ready. And only then do the deploy. Otherwise you might end up like me and lose a lot of time and stress yourself out.
Disclaimer:
While I didn’t do any modifications to the nginx setup I will talk about it in a future tutorial. I'm considering doing a tutorial about adding a custom domain and the issues I encountered. But there are already some very good tutorials on YouTube on this topic.
Also, I used standard MySQL for this tutorial, but using big data is possible as well.
Because I didn’t want to make this blogpost hard to read, in some sections, I added links and YouTube videos instead of images.
Some of the documentation on Google regarding PHP deployments is lacking, so I substituted it in some places with the documentation from Python. If you plan on deploying a Laravel app with Google App Engine just by following the Google documentation I highly recommend having a look at both.
Prerequisite reading (if you want to skip Preparing for the deploy):
2. PHP on Google Cloud Platform
We'll be using Flexible environment so read about that as well.
3. (Optional) Documentation for Python
Preparing for the deploy:
1. Create a Google cloud account: here or more directly here.
At the moment, you get a 365 day or a $300 credit free trial (whichever comes first). Unless you are a very old user (beta tester) you will also be required to add your credit card, but you will not be charged.
2. Create a new project (quick video here if needed)
3. Create an app engine instance (quik video here if needed)
4. We will use Google Cloud Shell to deploy
To be able to use it you need to download the cloud SDK for your operating system.
For some of the settings, you can use the cloud shell directly from your browser as seeen here. I do not use it, but read the docs to find out how. But you should really install it for ease of use.
If you run Windows you need to open the installer with administrator rights. Follow the quickstart tutorial from google for the other OSs.
5. Before you continue with Google Cloud Shell, I recommend reading this about the PHP environment.
6. Login in the console using command gcloud auth login. You will be logged in through the browser. If you want to see all the available commands write gloud help in the command line and press enter.
7. Write gcloud config set project project_id in the command line, where project_ id is the project id you just gave to your newly created project. It can be found on Google console on the first page after you select the project under Project info widget.
8. To see a list of all your projects type gcloud projects list.
This is it for the prerequisites. We will go through the database setup and downloads needed as we move along.
Preparing your project:
For this part I used this tutorial as an inspiration. You can read it or skip it completely since I will be covering all the steps needed for deploy, except for the file storage part. For that I will give you some info, but not a full blown tutorial.
For this tutorial I will be using as an exemple an application I am building right now. A simple blog having Backpack for Laravel as admin panel. While we're here, I have to let you know that Vue.js is compatible with Google App Engine. You just need to run npm install and npm run prod and that will do the trick. In this tutorial we will not be using Vue.js.
1. Change the directory to you application folder.
For ease of use you can set things up like this:
TUTORIALDIR= C:/Code/updivision-laravel-demo/
git clone https://github.com/Updivision/laravel-demo-google-cloud.git $TUTORIALDIR
cd $TUTORIALDIR
git checkout phase0-helloworld
We will need to create an app.yaml file. Just create it manually at the same level as composer.json.
2. Now that we have the file we need to setup the database and project details.
3. To setup the project details we will not be using the .env file from Laravel, but instead this app.yaml. Please follow the comments added in my sample of app.yaml to understand how I wrote it.
It needs to look like this:
runtime: php  # language of the app
env: flex     # let app engine know we use flexible environment

runtime_config:
 document_root: public   #folder where index.php is

# Ensure we skip ".env", which is only for local development
skip_files:
 - .env #we want to skip this to make sure we don’t mess stuff up on the server

env_variables:
 # Put production environment variables here.
 APP_ENV: local   # or production
 APP_DEBUG : true # or false
 APP_KEY: base64:FqwXmLtL6szdWqIVydb7nKs2eyvHib4lf6d5l6A/XW4=
#go to generate app key paragraf in this tutorial

 CACHE_DRIVER: database
# instead of putting the cache in the database I recommend using redis
 SESSION_DRIVER: database #or file since both work

 APP_LOG: daily
 APP_TIMEZONE: UTC #your timezone of choice


# follow the part of the tutorial on setting up your SQL database
 DB_CONNECTION: mysql
 DB_HOST: localhost
 DB_DATABASE: instance_id
 DB_USERNAME: database_user_name
 DB_PASSWORD: database_password
 DB_SOCKET: /cloudsql/instance_name

 QUEUE_DRIVER: database #in case you execute queued jobs

 MAIL_DRIVER: smtp
 MAIL_HOST: smtp.sparkpostmail.com
 MAIL_PORT: 587
 MAIL_USERNAME: sparkpost_username
 MAIL_PASSWORD: ****************

 LOG_DELETE:  true # this is a parameter added by us in the project .env file. You can add here any setting you would add to your .env file

 GOOGLE_VISION_PROJECT_ID : project_id

#we need this for the flex environment
beta_settings:
   # for Cloud SQL, set this value to the Cloud SQL connection name,
   # e.g. "project:region:cloudsql-instance"
   cloud_sql_instances: project:cloudsql-instance
4. Generate the app key.
To generate the app key for the Laravel installation we need to run:
php artisan key:generate --show
And then copy paste that in app.yaml.
5. Update composer.json to match Google App Engine requirements.
In scripts, add script as below. In post-install-cmd script there is a recommendation to add php artisan cache:clear however from my experience with Google deploy this does not work. That's why I recommend leaving it out. I only added the minimum Laravel packages in this composer.json example.
{
   "name": "laravel/laravel",
   "description": "The Laravel Framework.",
   "keywords": ["framework", "laravel"],
   "license": "MIT",
   "type": "project",
   "require": {
       "php": "7.1.*",
       "fideloper/proxy": "~3.3",
       "laravel/framework": "5.5.*",
       "laravel/tinker": "~1.0"
   },
   "require-dev": {
       "filp/whoops": "~2.0",
       "fzaninotto/faker": "~1.4",
       "mockery/mockery": "~1.0",
       "phpunit/phpunit": "~6.0",
       "symfony/thanks": "^1.0"
   },
   "autoload": {
       "classmap": [
           "database/seeds",
           "database/factories"
       ],
       "psr-4": {
           "App\\": "app/"
       }
   },
   "autoload-dev": {
       "psr-4": {
           "Tests\\": "tests/"
       }
   },
   "extra": {
       "laravel": {
           "dont-discover": [
           ]
       }
   },
   "scripts": {
   "post-root-package-install": [
           "@php -r \"file_exists('.env') || copy('.env.example', '.env');\""
       ],
       "post-create-project-cmd": [
           "@php artisan key:generate"
       ],
       "post-autoload-dump": [
           "Illuminate\\Foundation\\ComposerScripts::postAutoloadDump",
           "@php artisan package:discover"
       ],
       "post-install-cmd": [
           "Illuminate\\Foundation\\ComposerScripts::postInstall",
           "@php artisan optimize",
           "chmod -R 755 bootstrap\/cache"
       ],
       "post-update-cmd": [
           "Illuminate\\Foundation\\ComposerScripts::postUpdate",
           "@php artisan optimize"
       ],
       "post-autoload-dump": [
           "Illuminate\\Foundation\\ComposerScripts::postAutoloadDump",
           "@php artisan package:discover"
       ]
   },
   "config": {
       "preferred-install": "dist",
       "sort-packages": true,
       "optimize-autoloader": true
   }
}
7. Run gcloud app deploy in the google sdk command line (you have to be in the application folder) and when prompted answer Y.
descriptor:      [\blog\app.yaml]
source:          [\blog]
target project:  [updivision-laravel-demo-197514]
target service:  [default]
target version:  [20180309t203424]
target url:      [https://updivision-laravel-demo-197514.appspot.com]


Do you want to continue (Y/n)?  Y
8. Run gcloud app browse to see your app.

Setting up cron jobs.
Here is the Google tutorial for setting cron jobs. I also took a look at the Python version. Knowing how to setup the cron jobs with Google App Engine when having a Laravel app is basic. Our app had a lot of schedules running and I had a hard time making them work or finding an answer anywhere on the web. Fortunately, we had the same issue with Amazon and already knew a fix. I tried it with Google App Engine and Hallelujah!
1. Create a cron.yaml file and add this code:
cron:
- description: "daily laravel cron"
 url: /scheduler
 schedule: every 1 mins
 retry_parameters:
     min_backoff_seconds: 2.5
     max_doublings: 5
2. In your routes you need to add the scheduler route like this (outside of any middleware):
Route::get('scheduler', function (){
   \Illuminate\Support\Facades\Artisan::call('schedule:run');
});
3. Run gcloud app deploy cron.yaml
4. You can see your crons or run them manually in App Engine Task queues.
Setting up a SQL database
This seems to make some people spin their heads, so I’m gonna try to make it as easy and visual as possible. I also added a quick video here.
1. Go to your Google Cloud console.
2. In the menu look for SQL and click it.
3. Click create instance and choose MySQL.
4. Choose second generation and choose an id and a password.
5. Your instance is spinning up.
6. Now copy the instance connection name and paste it in your app.yaml in beta_setting cloud_sql_instances: instance_connection_name.
beta_settings:
   # for Cloud SQL, set this value to the Cloud SQL connection name,
   # e.g. "project:region:cloudsql-instance"
   cloud_sql_instances: instance_connection_name
7. Also complete the database connection data in app.yaml.
Copy the instance id and paste it for DB_DATABASE.
Then copy the instance connection name and add it after /cloudsql/ for DB_SOCKET.
DB_CONNECTION: mysql
DB_HOST: localhost
DB_PORT: 3306
DB_DATABASE: instance_id
DB_USERNAME: root
DB_PASSWORD: ***************
DB_SOCKET: /cloudsql/instance_connection_name
8. Deploy the app again.
9. The database is now empty and I get this error:
![]()
10. Connecting to the database:
- Using certificates (read about this in view data section of the article).
- Using command line (read about this in running migrations section of the article).
Importing a fully migrated database with data in it:
To import a full database in your newly created database you need to use Google Bucket.
1. Dump your current database.
mysqldump -uuser -p your_database > your_database_dump.sql
2. Go to your dashboard and in the left side menu click on Storage. Choose a bucket and upload your database dump
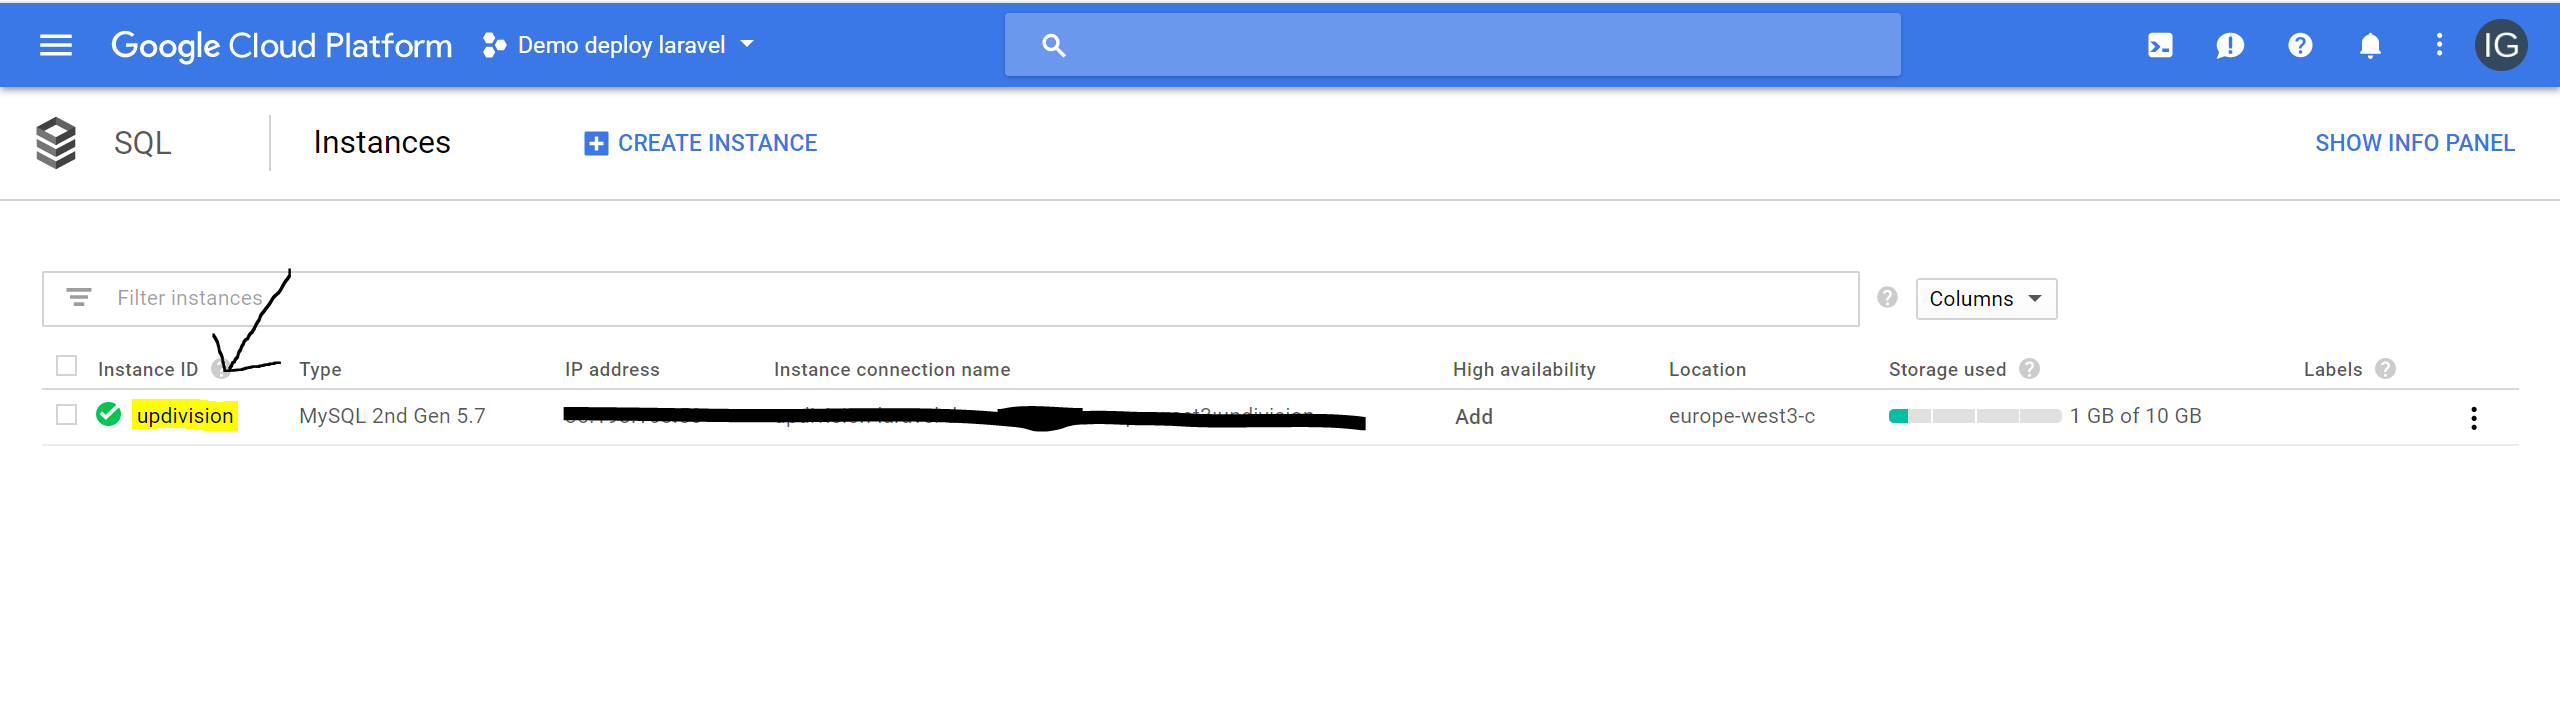
3. Go to your google console dashboard and click on you instance id
4.Click on import.
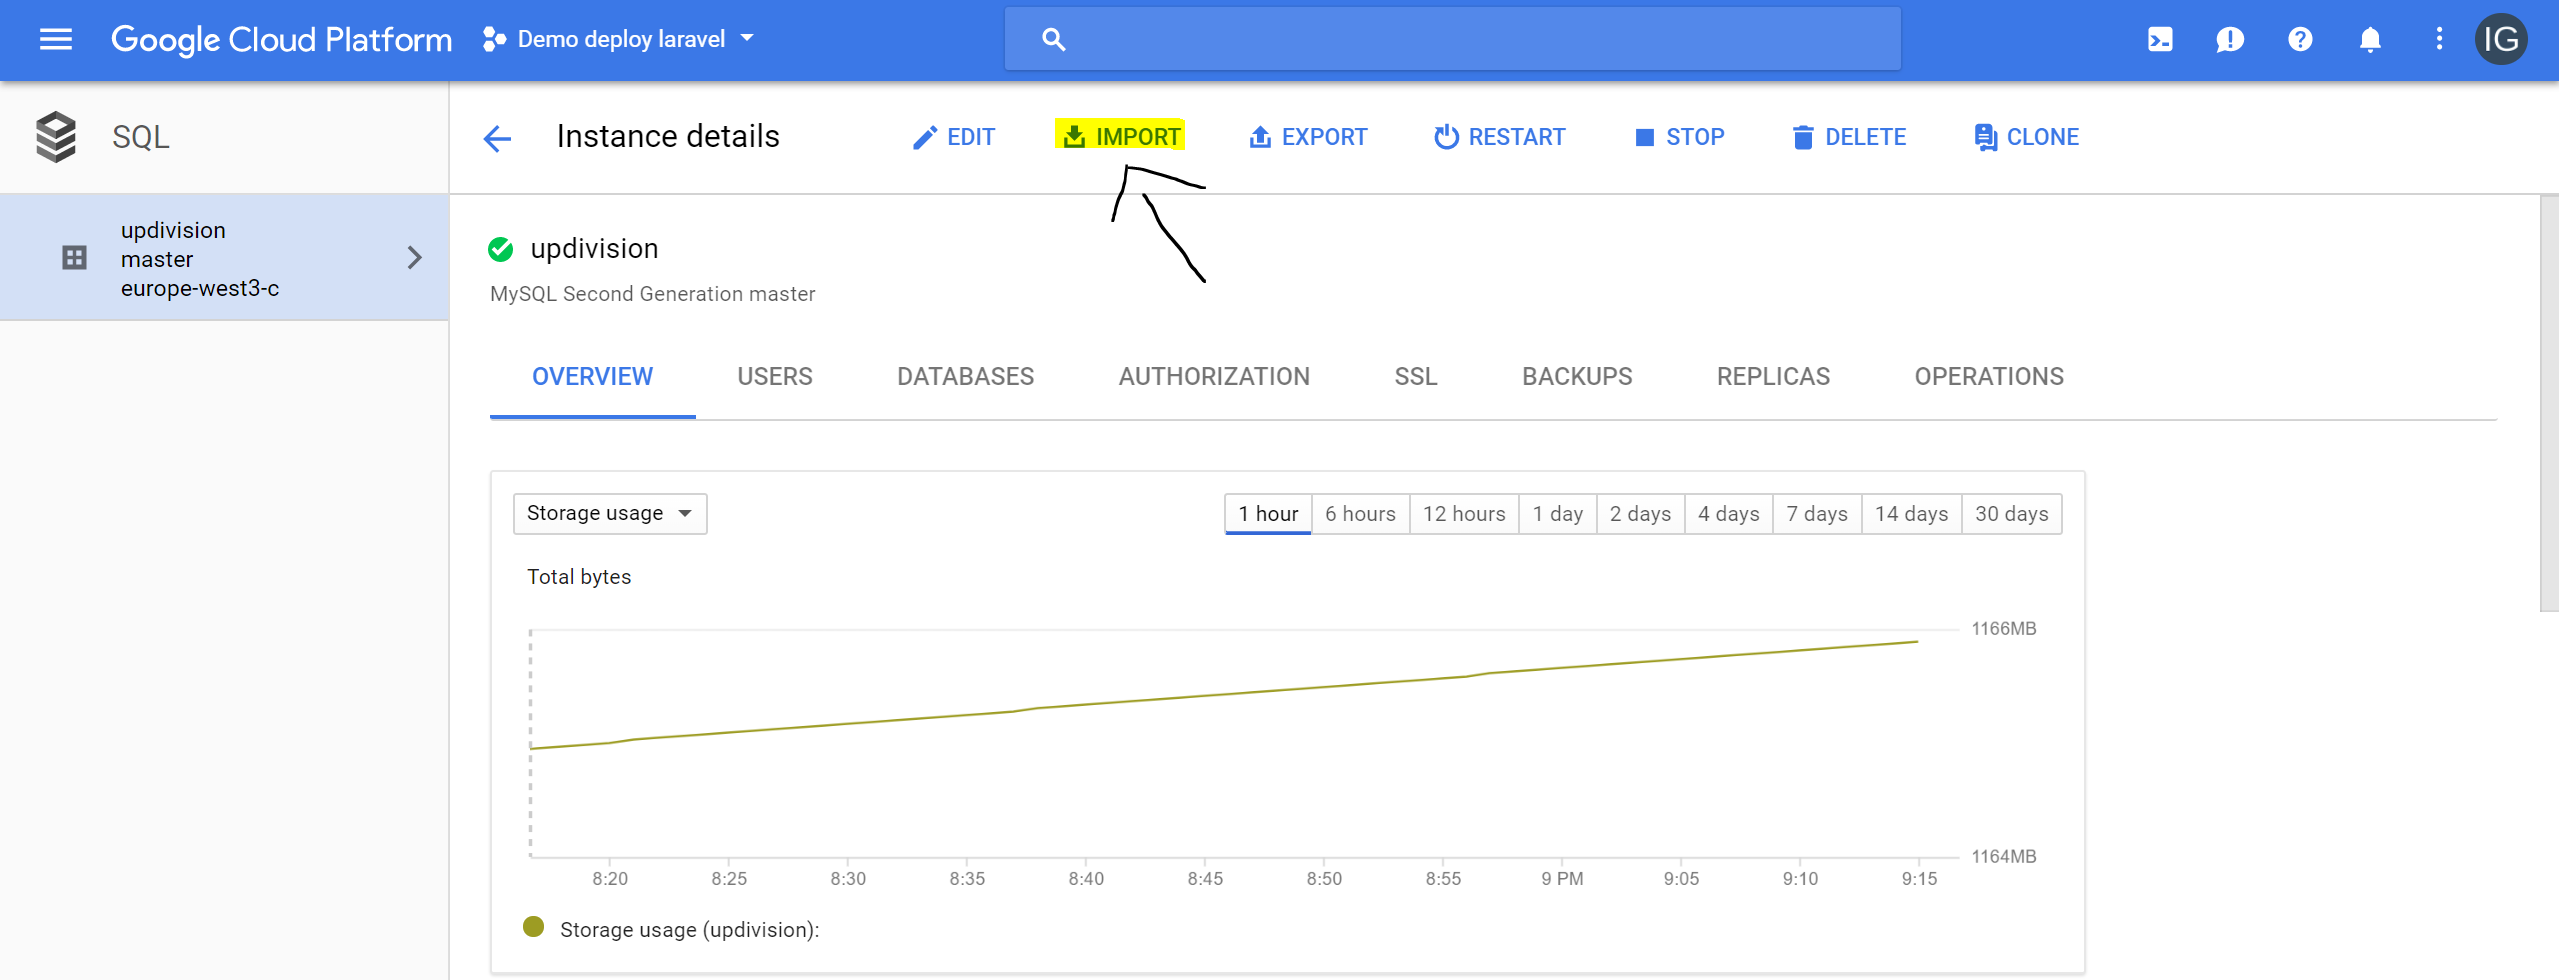
5. Choose the file you uploaded at step 2.
6. Click on advanced options and under database select the name of the database.
7. Click Import.
View data
The recommended way to view data, at least in my experience, is to use Workbench and the certificates Google provides. For this part I used this document as inspiration.
1. Go to your Google Console Dashboard and click on you instance id.
2. On the top of the screen (right above the charts) choose SSL.
3. Scroll down and click on Create a client certificate and store them on your computer. I recommend one per computer, but it’s up to you.
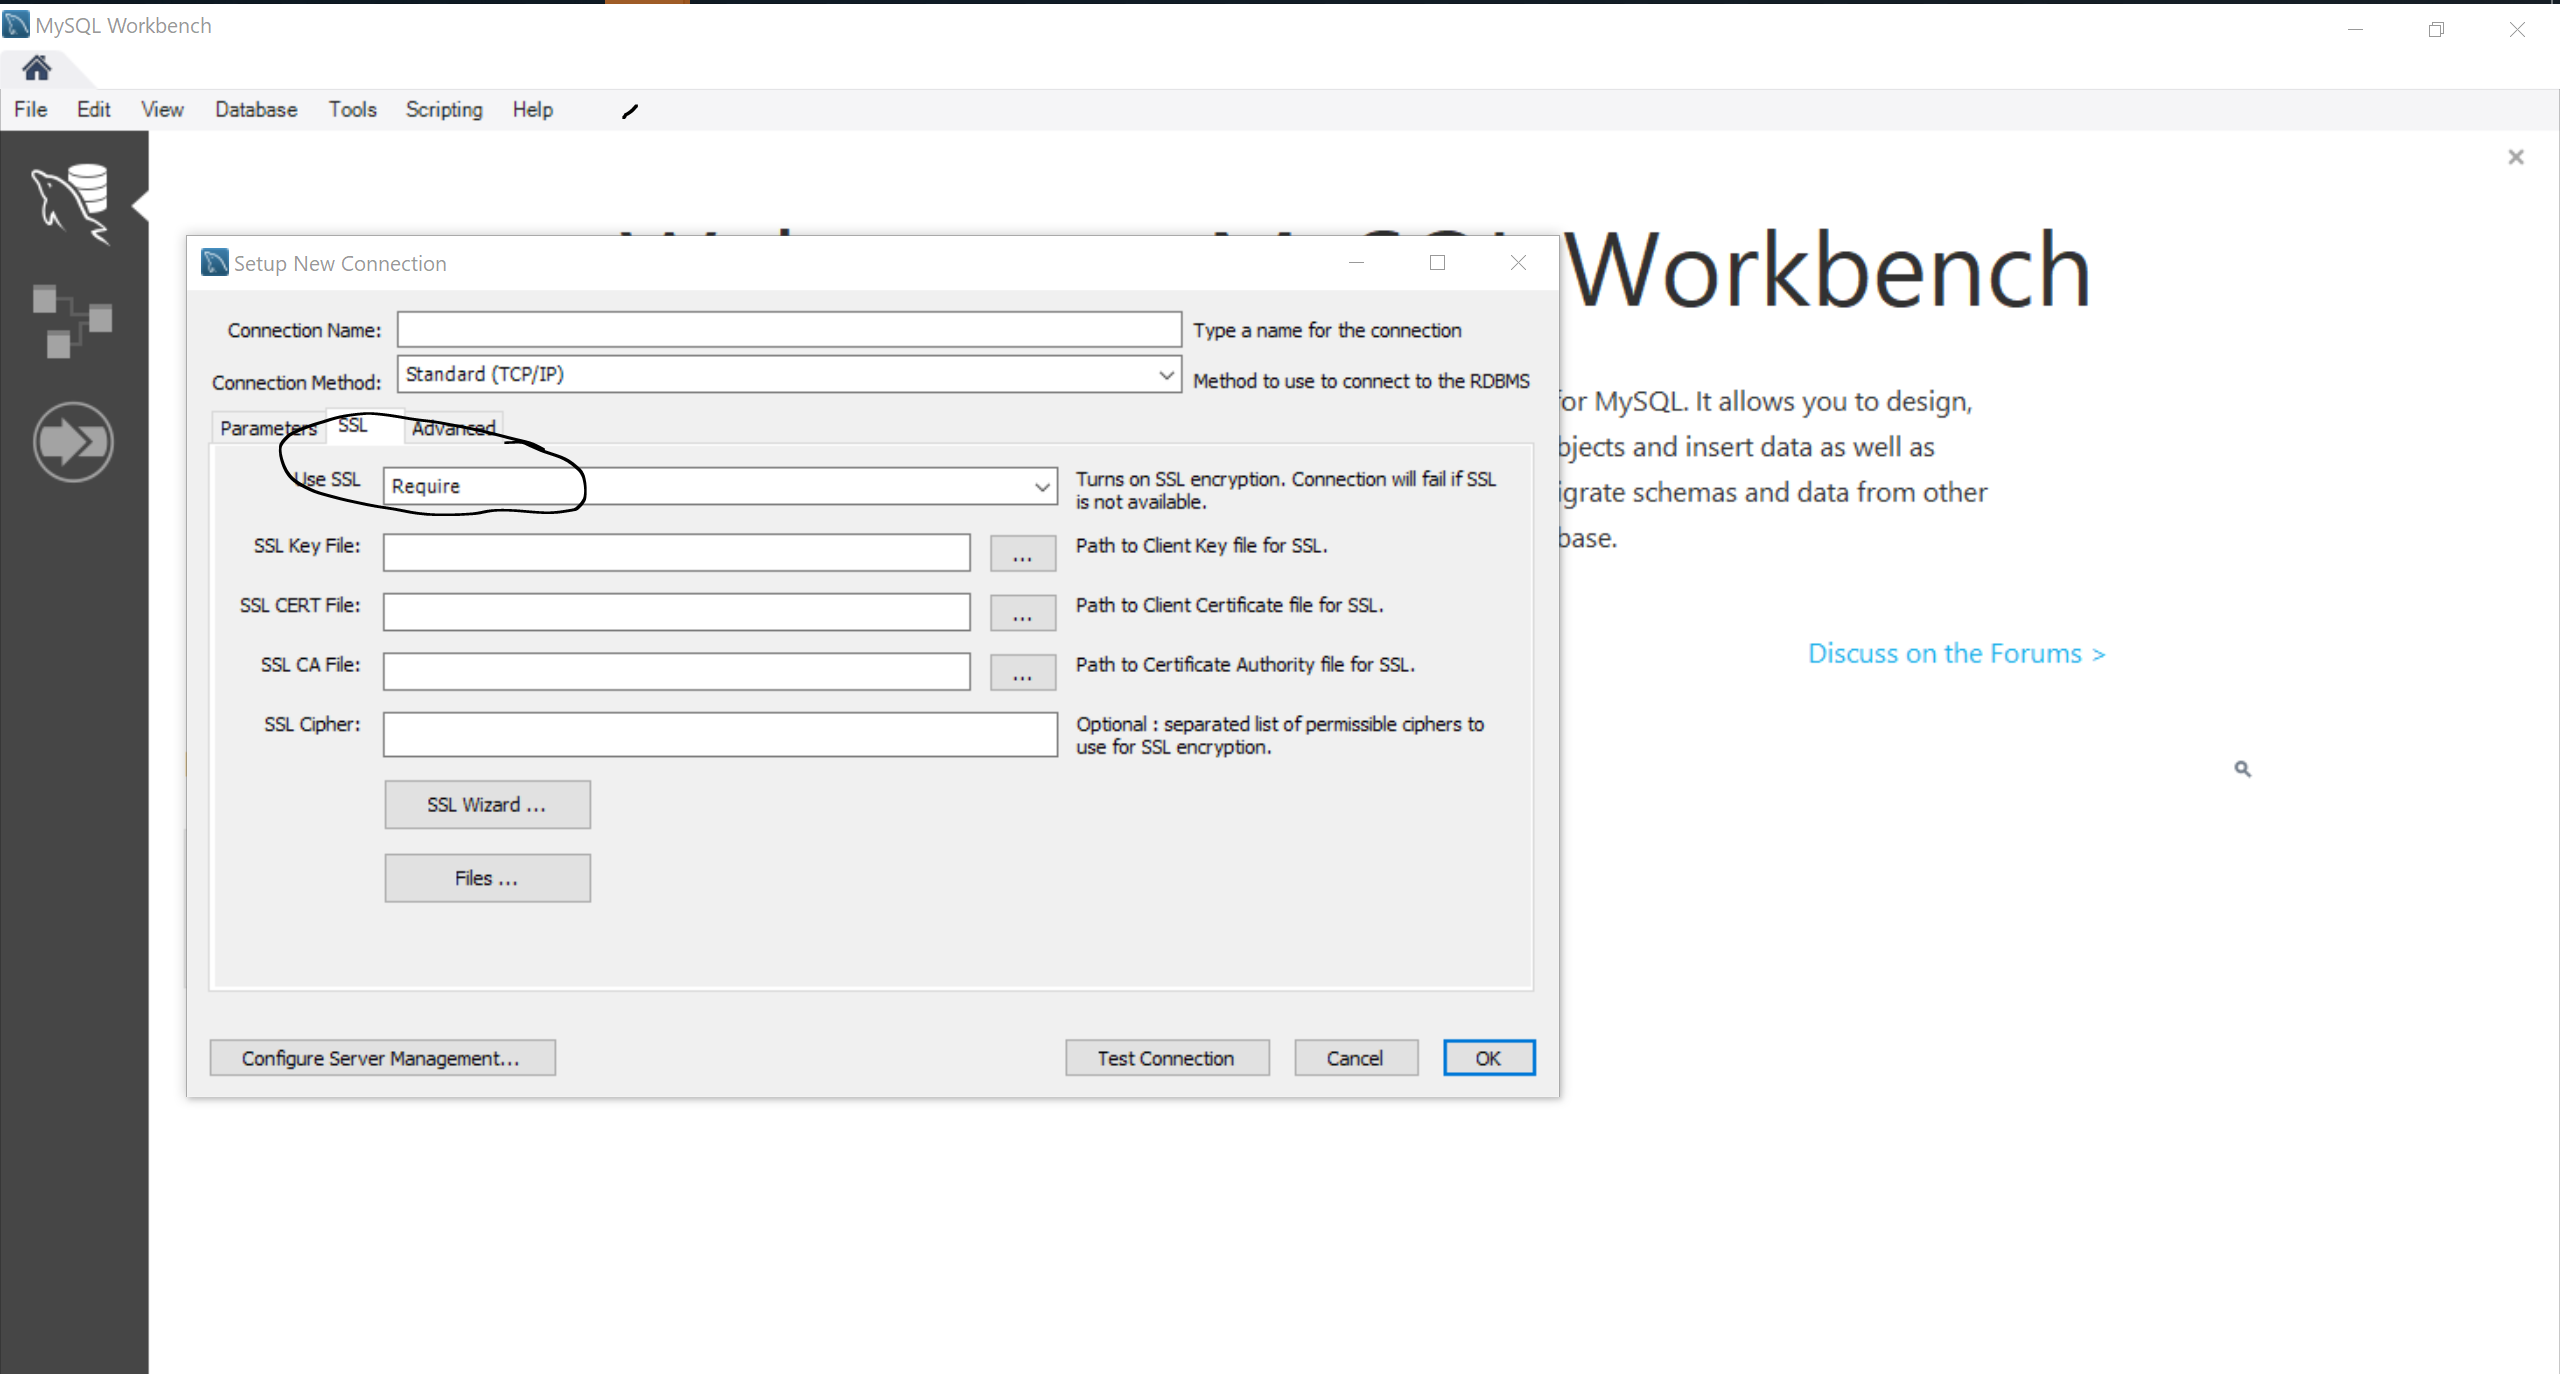
4. Open MySQL Workbench and in the connection tab complete the details from Overview tab => Connect to this instance a square (for the ip mostly). Use the same user and password as you app.yaml.
.PNG)
And in the SSL tab add the certificates you just downloaded. In use ssl drop down choose required. Now you have access to your database.
The next and last step of this tutorial is running migrations and seeders, but feel free to skip it if you got everything you needed already.
Running migrations and seeders
To run the migrations and seeder you need to do kind of a hack, but if you found another way please let me know in the comments below, because I’ve been looking for a more elegant method.
1. Go and download the proxy file.
2. In the Google Cloud Console change directory to the directory where you downloaded the file.
3. Create a service account file.
4. Run this command:
cloud_sql_proxy_x64.exe -instances=your_instance_connection_nameive=tcp:3306 -credential_file=path/to/service_account_file &
5. In your .env file put your database and password from Google and use localhost as host.
6. In command line run any migration or seeder command as you would normally do.
php artisan migrate --seed
Or you can run a single seeder:
php artisan migrate db:seed --class=SeederClass
Setting up storage
To set up storage do this in the config/filesystem.php and add a disk for Google:
'google' => [
'driver' => 's3',
'key' => 'xxx',
'secret' => 'xxx',
'bucket' => 'qrnotesfiles',
'base_url'=>'https://storage.googleapis.com' ]
Other useful materials on deploying a Laravel app on Google App Engine:
Stay tuned for this upcoming tutorials (subscribe to our newsletter to make sure you don't miss them):
Autodeploy on Google App Engine using Bitbucket
Create a Laravel blog with Backpack.


