

April 11th, 2024, posted in learning
by Adelina
We previously had an article about deploying Laravel on Google app engine. However, after using it for a while we decided we needed more flexibility and access to the server and we started researching. Result: now we've moved on to Google Compute engine.
Google Compute Engine (GCE) is closer to a VPS and they each have their advantages and disadvantages. While I don’t think Google Compute Engine is the best choice for all apps, we had a very specific need for a certain data center and a static IP in that area. With these restrictions in mind, GCE looked like the best course of action. The following is the illustrated story of how we did it.
Before starting
Before taking this road I highly recommend going through the Google documentation. While this blogpost will be enough to get your app up and running some more customization might be done though reading the docs.
Google’s documentation on deploying a PHP app are quite lacking, so I also took a look at the Python docs, which helped.
I must also note that I used NGINX for this example. If you want to use Apache instead please take a look at this comunity tutorial:
https://cloud.google.com/community/tutorials/setting-up-lamp?hl=zh-TW
This deployment requires basic knowledge of Linux as we will be deploying on a Linux VM.
Prerequisites
1. Google cloud shell https://cloud.google.com/shell/docs/quickstart
2. PHP on Google Cloud Platform https://cloud.google.com/php/docs
We will be using Flexible environment so read that.
4. Optional https://cloud.google.com/python/docs/
5. Set-up your ssh key
In your terminal (I use git bash on Windows to have the liberties as Ubuntu/Linux) type:
ssh-keygen -t rsa
When prompted for a location and file name click enter for default or set your own
Enter file in which to save the key (/home/.ssh/id_rsa):
When prompted for a passphrase write a secure one (recommended) or click enter to skip using a passphrase
Enter passphrase (empty for no passphrase):
Run this command to get your public key and copy it for later.
cat ~/.ssh/id_rsa.pub
On my decision to use GCE
Preparing for deploy
NOTE: this piece of the article was copied and adapted from our Google App Engine
1. Create a google cloud account: https://cloud.google.com/ or directly here https://console.cloud.google.com
You get a 365 day/ 300$ credit as trial (whichever comes first). Unless you are a very old user (beta tester) you will also be required to add your card, but you will not be charged.
2. Create a new project => quick video here if needed
3. Creating a compute engine instance continues below
4. We will use Google cloud shell to deploy
https://cloud.google.com/shell/docs/quickstart
To be able to use it you need to download the cloud SDK for your operating system
You can use the cloud shell directly from your browser as seen here or you can install the cloud shell. I installed it on my computer as I found the browser one impossible to use)
If you run windows you need to open it with administrator rights. Follow the quickstart tutorial from google for the other OSs.
5. Before you continue with google cloud shell I recommend reading this about the php environment https://cloud.google.com/php/docs
6. Login from the console using command gcloud auth login. You will be logged in through the browser. If you want to see all the available command write gloud help in the command line and press enter.
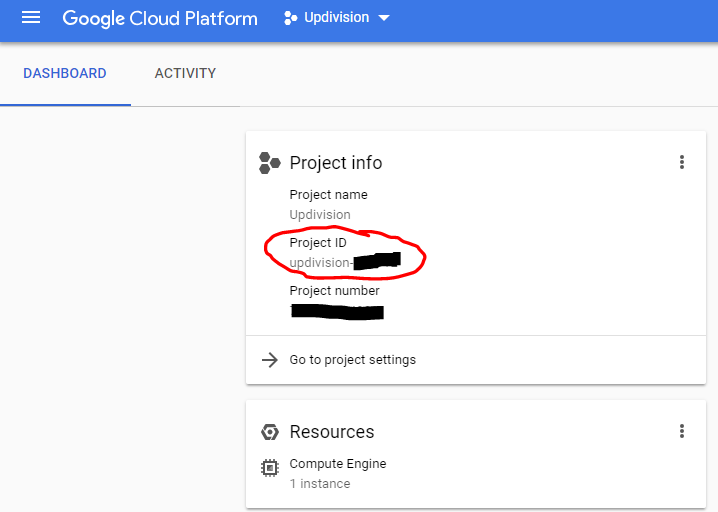
7. Write gcloud config set project project_id in the command line, where project id is the project id you just gave to your newly created project. It can be found on google console in the first page after you select the project under Project info widget.
8. To see a list of all your projects type gcloud projects list.
This is it for the prerequisites. We will go through the database setup and downloads needed as we move along.
Preparing your project
Unlike the GAE, to deploy on GCE you just don’t need to change things. However, you could put your app in a docker container as explained here and make your work easier.
Creating a compute engine instance
1. Click create new Instance
2. On the create instance page
Make sure you know who you’re serving. GCE is setup per Region. In my case I plan on serving the EU and Australia. So I will create 2 instances with a load balancer in front of them.
a. Name: Give a name to your instance (will be used when connecting through the google cloud SDK shell)
b. Region: choose the region you want to server (in my case I choose europe-west-3 and australia-southeast1). Feel free to choose any zone you want.
c. Machine type: I recommend using multiple micro instances in the beginning to test what you need. Check the price in the right. It usually differs slightly depending on the are for what I can only assume are taxes.
You can customize your machine. Go ahead and check that.
d. Container: here is where you can solve a huge headache and go ahead with using Docker. I will use the machine as a VPS so I won’t be using this for now
e. Identity and API Access: Since we implement a multitude of Google’s APIs for this app, including logging and storage I chose Allow full access to all Cloud APIs. However if you only plan on using one or two APIs go with Set access for each API. I am not a fan of Allow default access, but the good news is you can change this settings at anytime.
f. Firewall: I went ahead and chose Allow HTTPS traffic. This is because we don’t plan on allowing any http traffic. Just go ahead and make your choice here according to what you use in your app (external apis, cors requests etc)
g. Go ahead and click on Management, disks, networking, SSH keys since we will be setting up an ssh key and some more settings.
i. Description: I left it blank
ii.Labels: I left it blank. They are used to organize the project, but since I create a new Google Cloud Project for each Laravel project I have, I skip this every time
iii.Deletion protection: if you enable this you cannot delete this instance anymore. The only way to delete the instance is to delete the entire project. You can shutdown the instance to avoid billing, however.
iv.Automation
1. Startup script: blank. Add any script that you want to be run on instance statup
2. Metadata: blank. Used for startup and shutdown scripts (if you have any). I don’t.
v.Availability policy
1.Preemptibility: off unless you want a tmp calculation machine
2.Automatic restart: on, otherwise your server might stay down after maintenance of hardware failure
3.On host maintenance: Migrate VM instance, otherwise your machine can be terminated when servers are moved or maintained.
3. Done. Click create.
4.Now I created the EU|machine and should create the Australian machine as well, but upon deliberating the issue I decided to finish setting up the first one and then just clone it.
5.This is my current machine setup (currently turned off): PHOTO
Setting up a Compute engine machine
After starting up my machine I will go ahead and login into it through the console.
There are two ways to do it:
1.From the browser (click the ssh button in the instance list). Which I won’t do because I prefer the google sdk console, but if you’re on the go and in a hurry it’s a good choice.
2. Fire up the google console and type:
gcloud auth login
Once you click enter you will be redirected to your browser where you can log in normally in your google account.
3. Now to we need to setup the project. So just type type this in the console:
gcloud config set project project_id
Where project_ id is the project id you just gave to your newly created project. It can be found on Google console on the first page after you select the project under Project info widget.
4. To see a list of all your projects type:
gcloud projects list
5. To login into your machine type:
gcloud compute ssh instance-x
Instance-x being the name of the instance
To see info about the project type:
gcloud compute project-info describe --project PROJECT_ID
If you already have a project in another zone use this command:
gcloud compute project-info add-metadata --metadata google-compute-default-region=europe-west1,google-compute-default-zone=europe-west1-b
If any issue arise with your ssh connection try running:
sudo gcloud compute config-ssh
Or follow this tutorial:
https://cloud.google.com/compute/docs/instances/connecting-advanced#thirdpartytools
6. Done
Setting up the database
To setup the database we have to follow pretty much the same process as the one for google app engine.
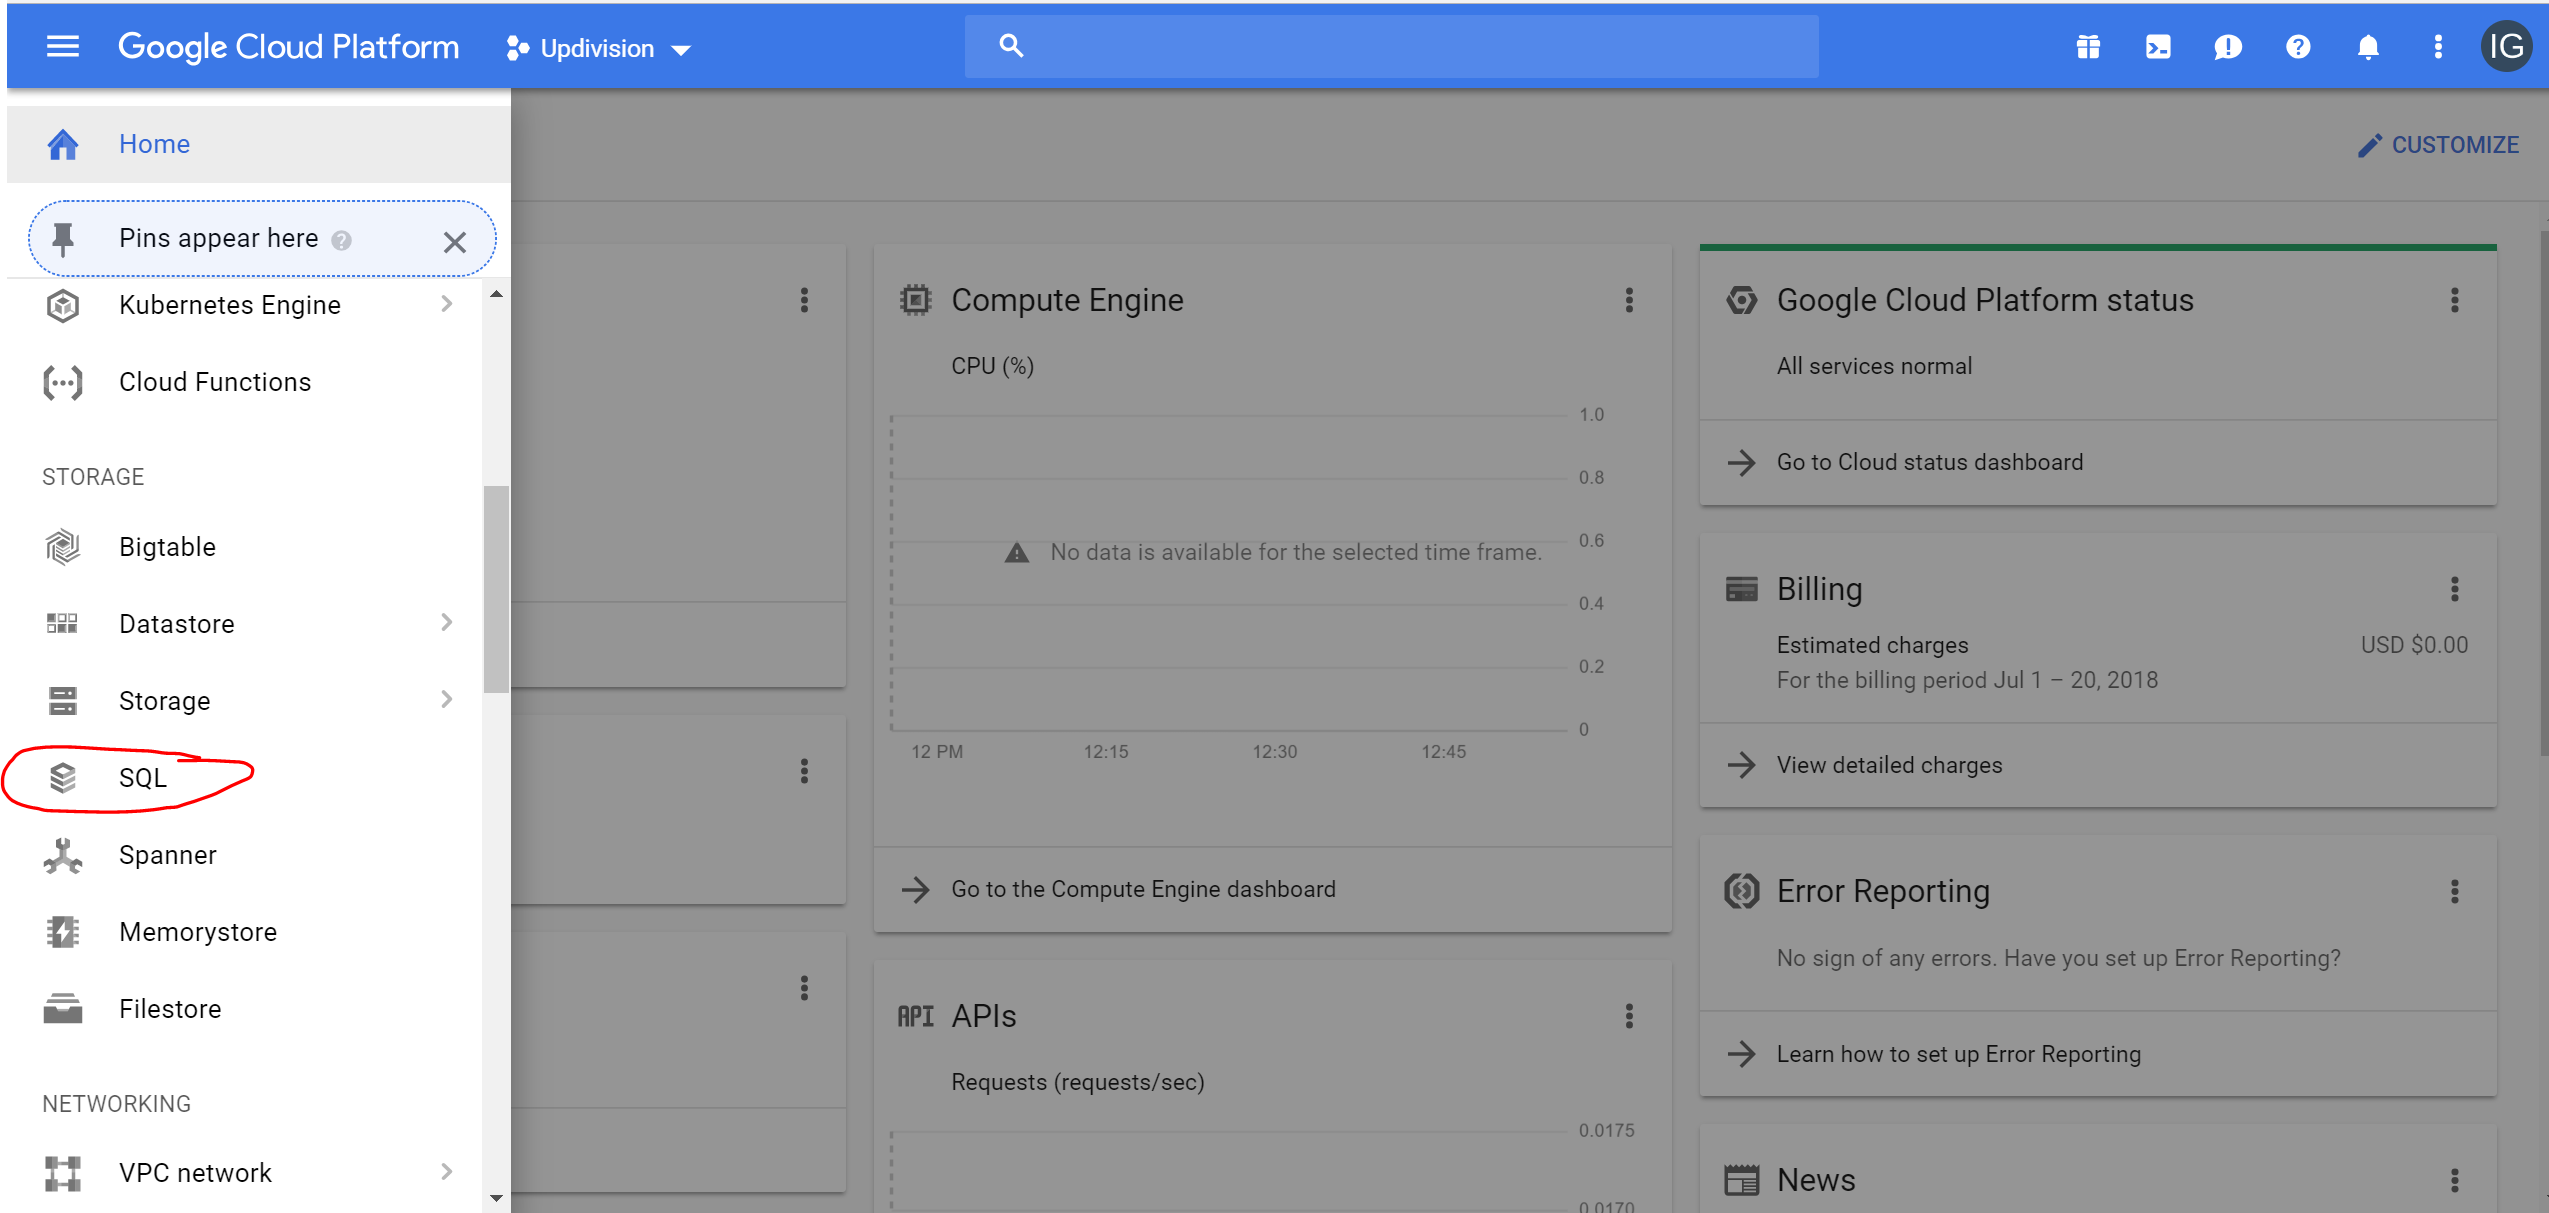
Go to https://console.cloud.google.com, select your project and then go to the left hand menu and choose SQL.
Once there click create instance (second generation) and give the SQL DB instance a name. For more info on choosing the setting please refer to the Setting up a SQL database section in How to deploy a Laravel web app on Google App Engine.
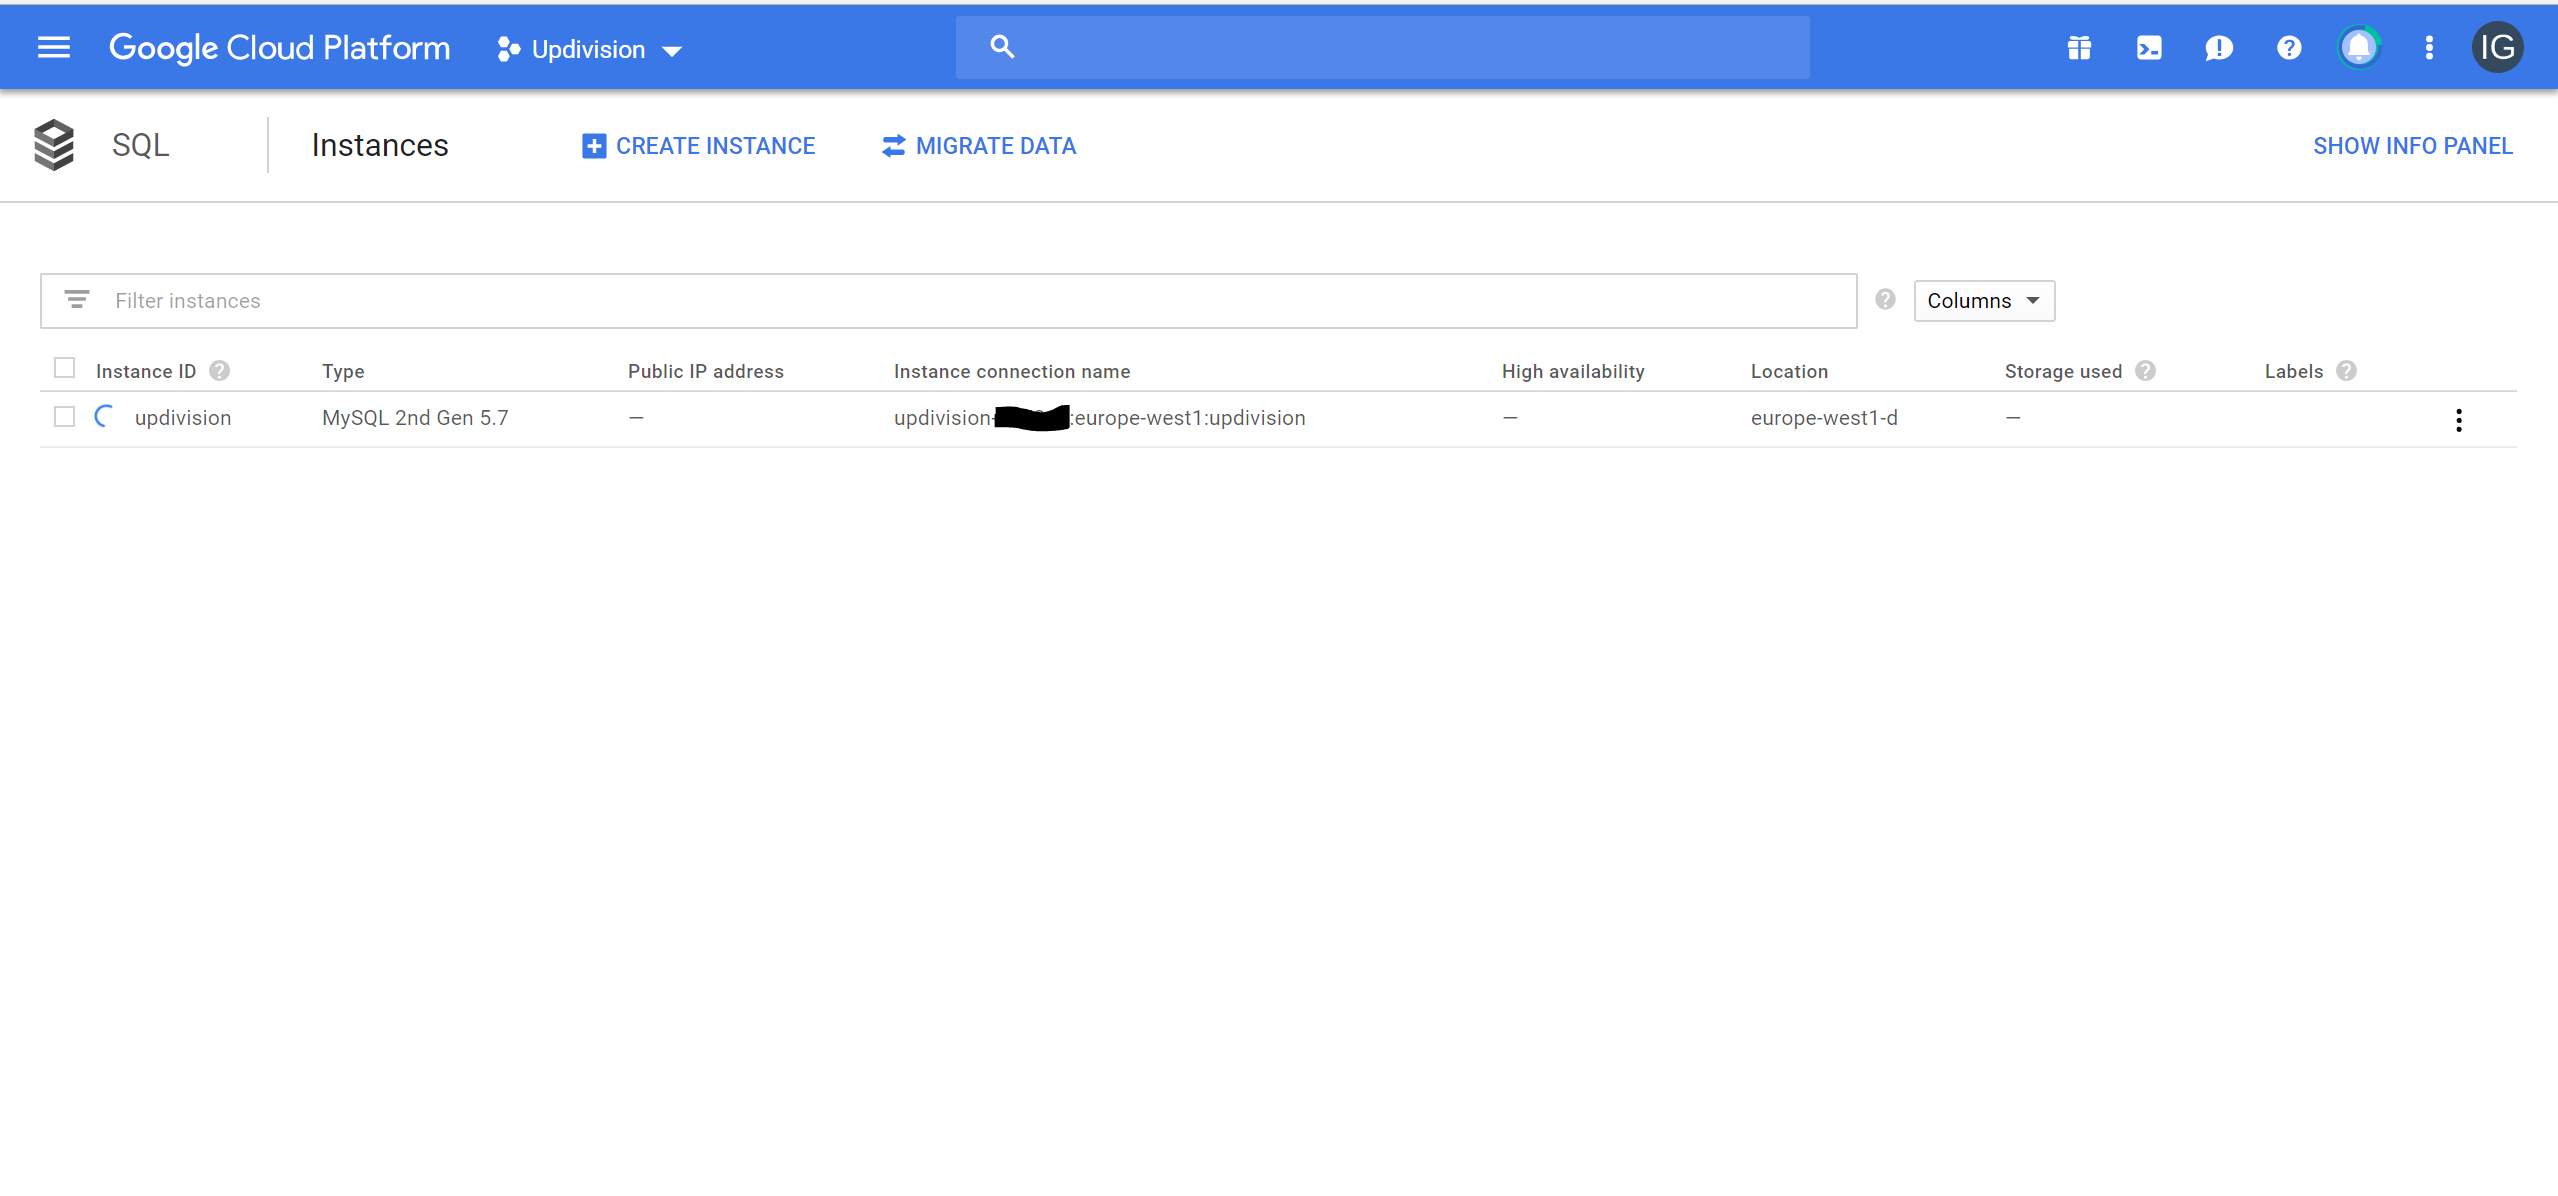
Once you created the database that fits your needs you will connect it to both instances.
This is how it’s done:
1. Go to your instance list and copy the external ips of the compute engine
2. Click on the database and the ngo to Authorization Tab

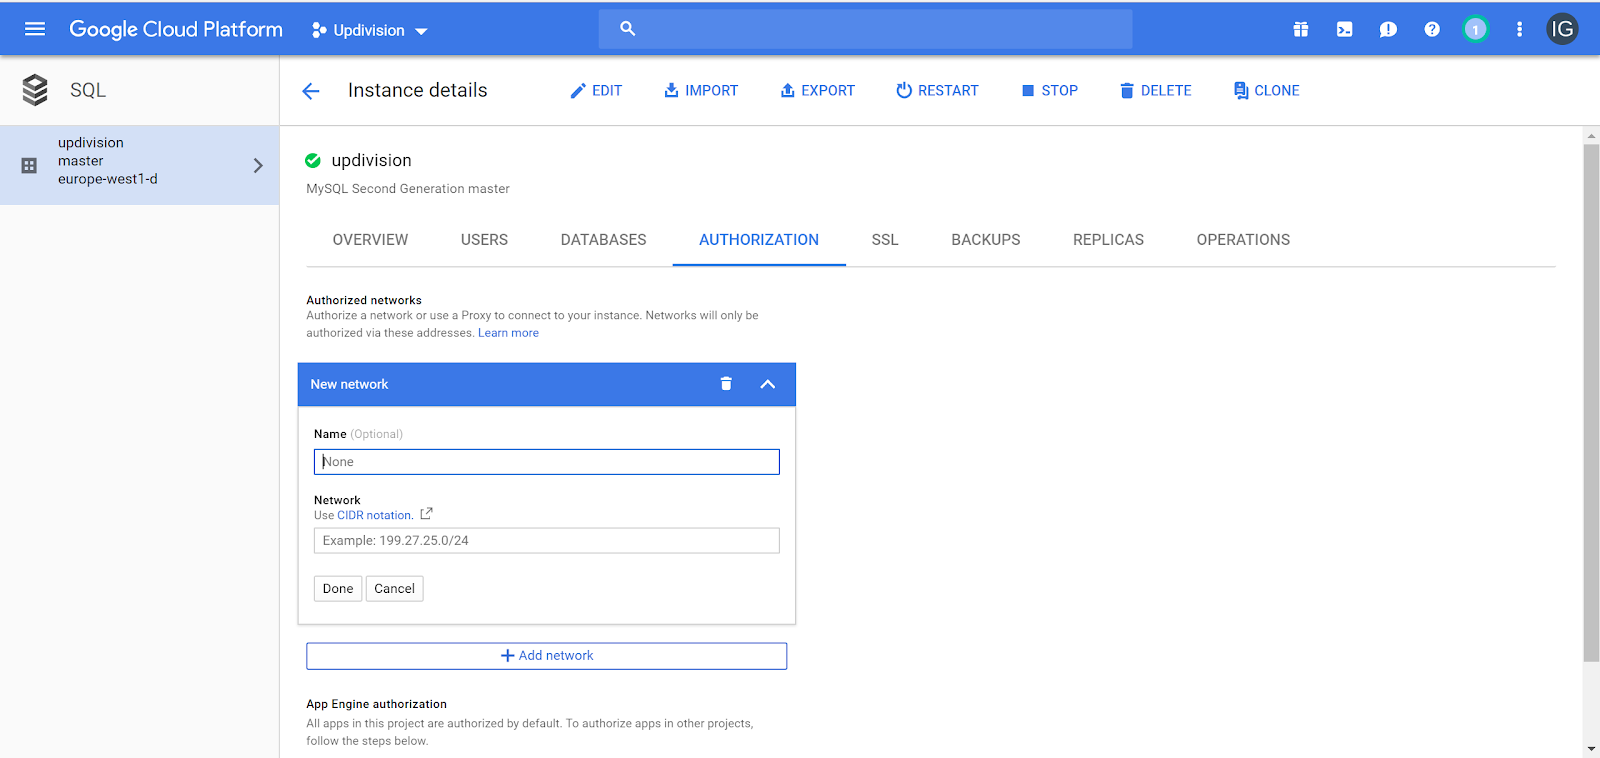
In The Authorization tab add the Name of the instance in the Name input and the ip address in the Network input.
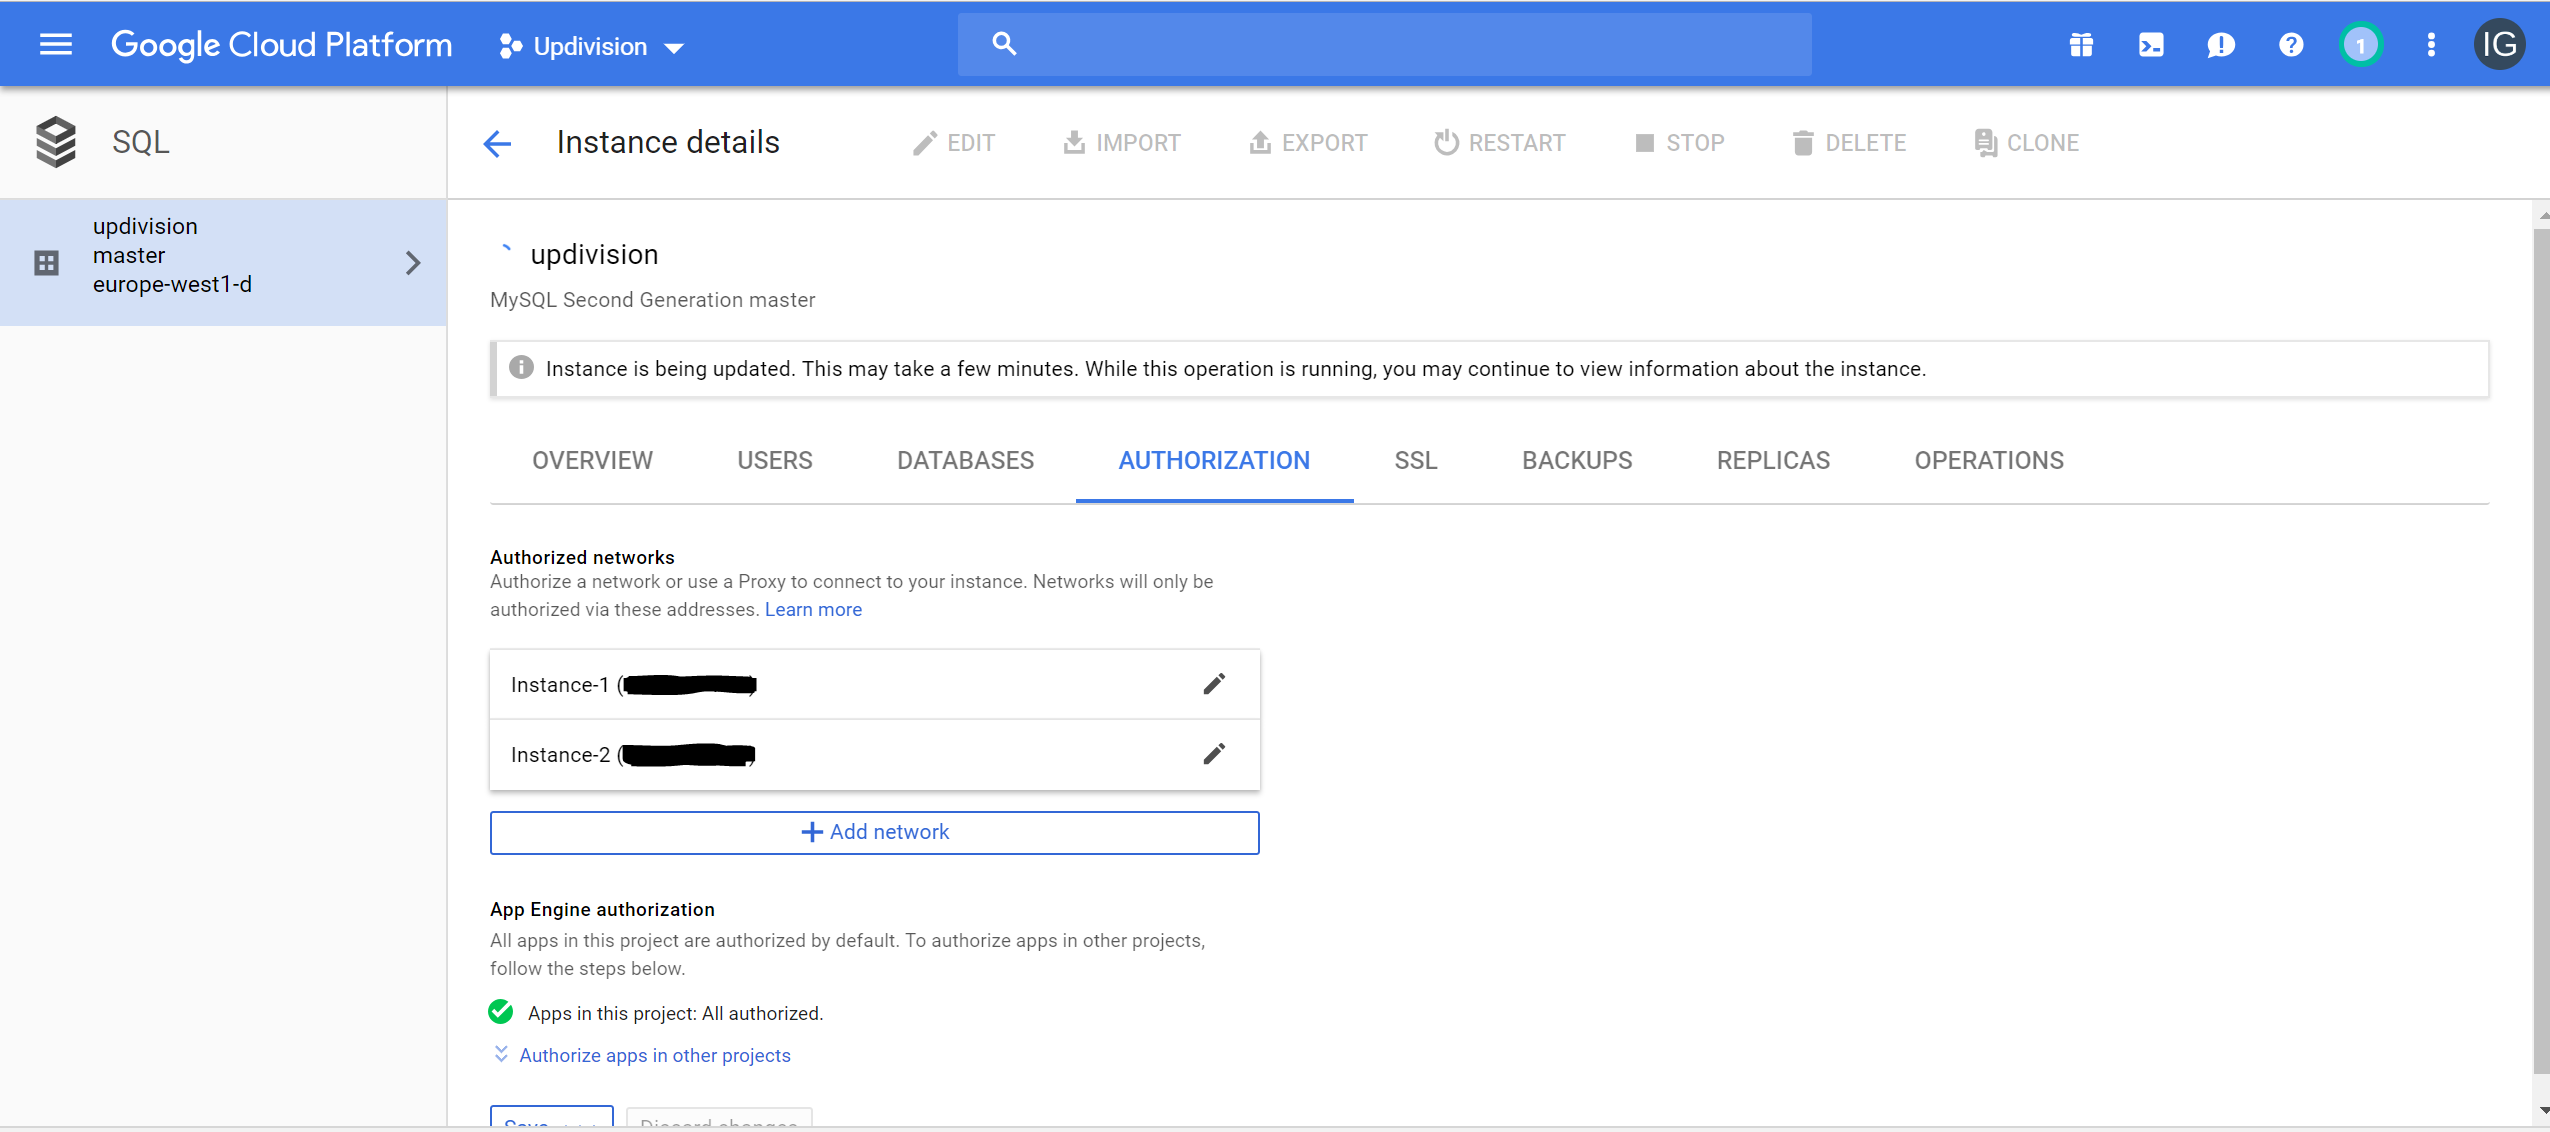
3. With he the database username, host and name setup your .env file
Instance groups and ssl
Now you’re in. This is like any other VPS machine so go ahead and install nginx, php, mysql, git, composer modules (not the db since that is manages) and so on.
The server usually comes with apache running, but I prefer nginx due to and optimization issues I usually run in with apache.
NOTE: you are responsible for anything you install on your machine and any potential issues.
Now I’ll just clone my repository in usr/share/nginx/html and setup sites enabled.
Single machine vs multiple machine setup
Right now you have the option of installing letsencrypt certificate and move on with your live or you can continue on with a multiple machine setup. If you choose to keep just one machine then scroll down to Setting up your domain, but if you decide to keep going with the multiple machine setup then keep reading.
Multiple machine setup
Once my machine is up and running I clone the first instance and move the data center of the second one to US-east1. After I clone the machine I have to setup the second machine the same way I did the first.
During the process of writing this blog I deleted and recreated the machines so names might change in pictures, but I will continue naming them instance 1 and 2.
Once your instances are ready it’s time to create an instance group.
Creating an instance group
Go to your VM instance list. On the 3 dots at the end on your first instance click New instance group.

Choose unmanaged (or not, depending on your needs) and add the second instance at the end of the page. Click create.
If you want to choose manage you need to create and instance template that google can automatically spin up when traffic increases. For that you also need a startup script to run when the instance it’s spinned up. You can write that in bash.


Setting up the domain
Go to the left hand menu and choose VPC network
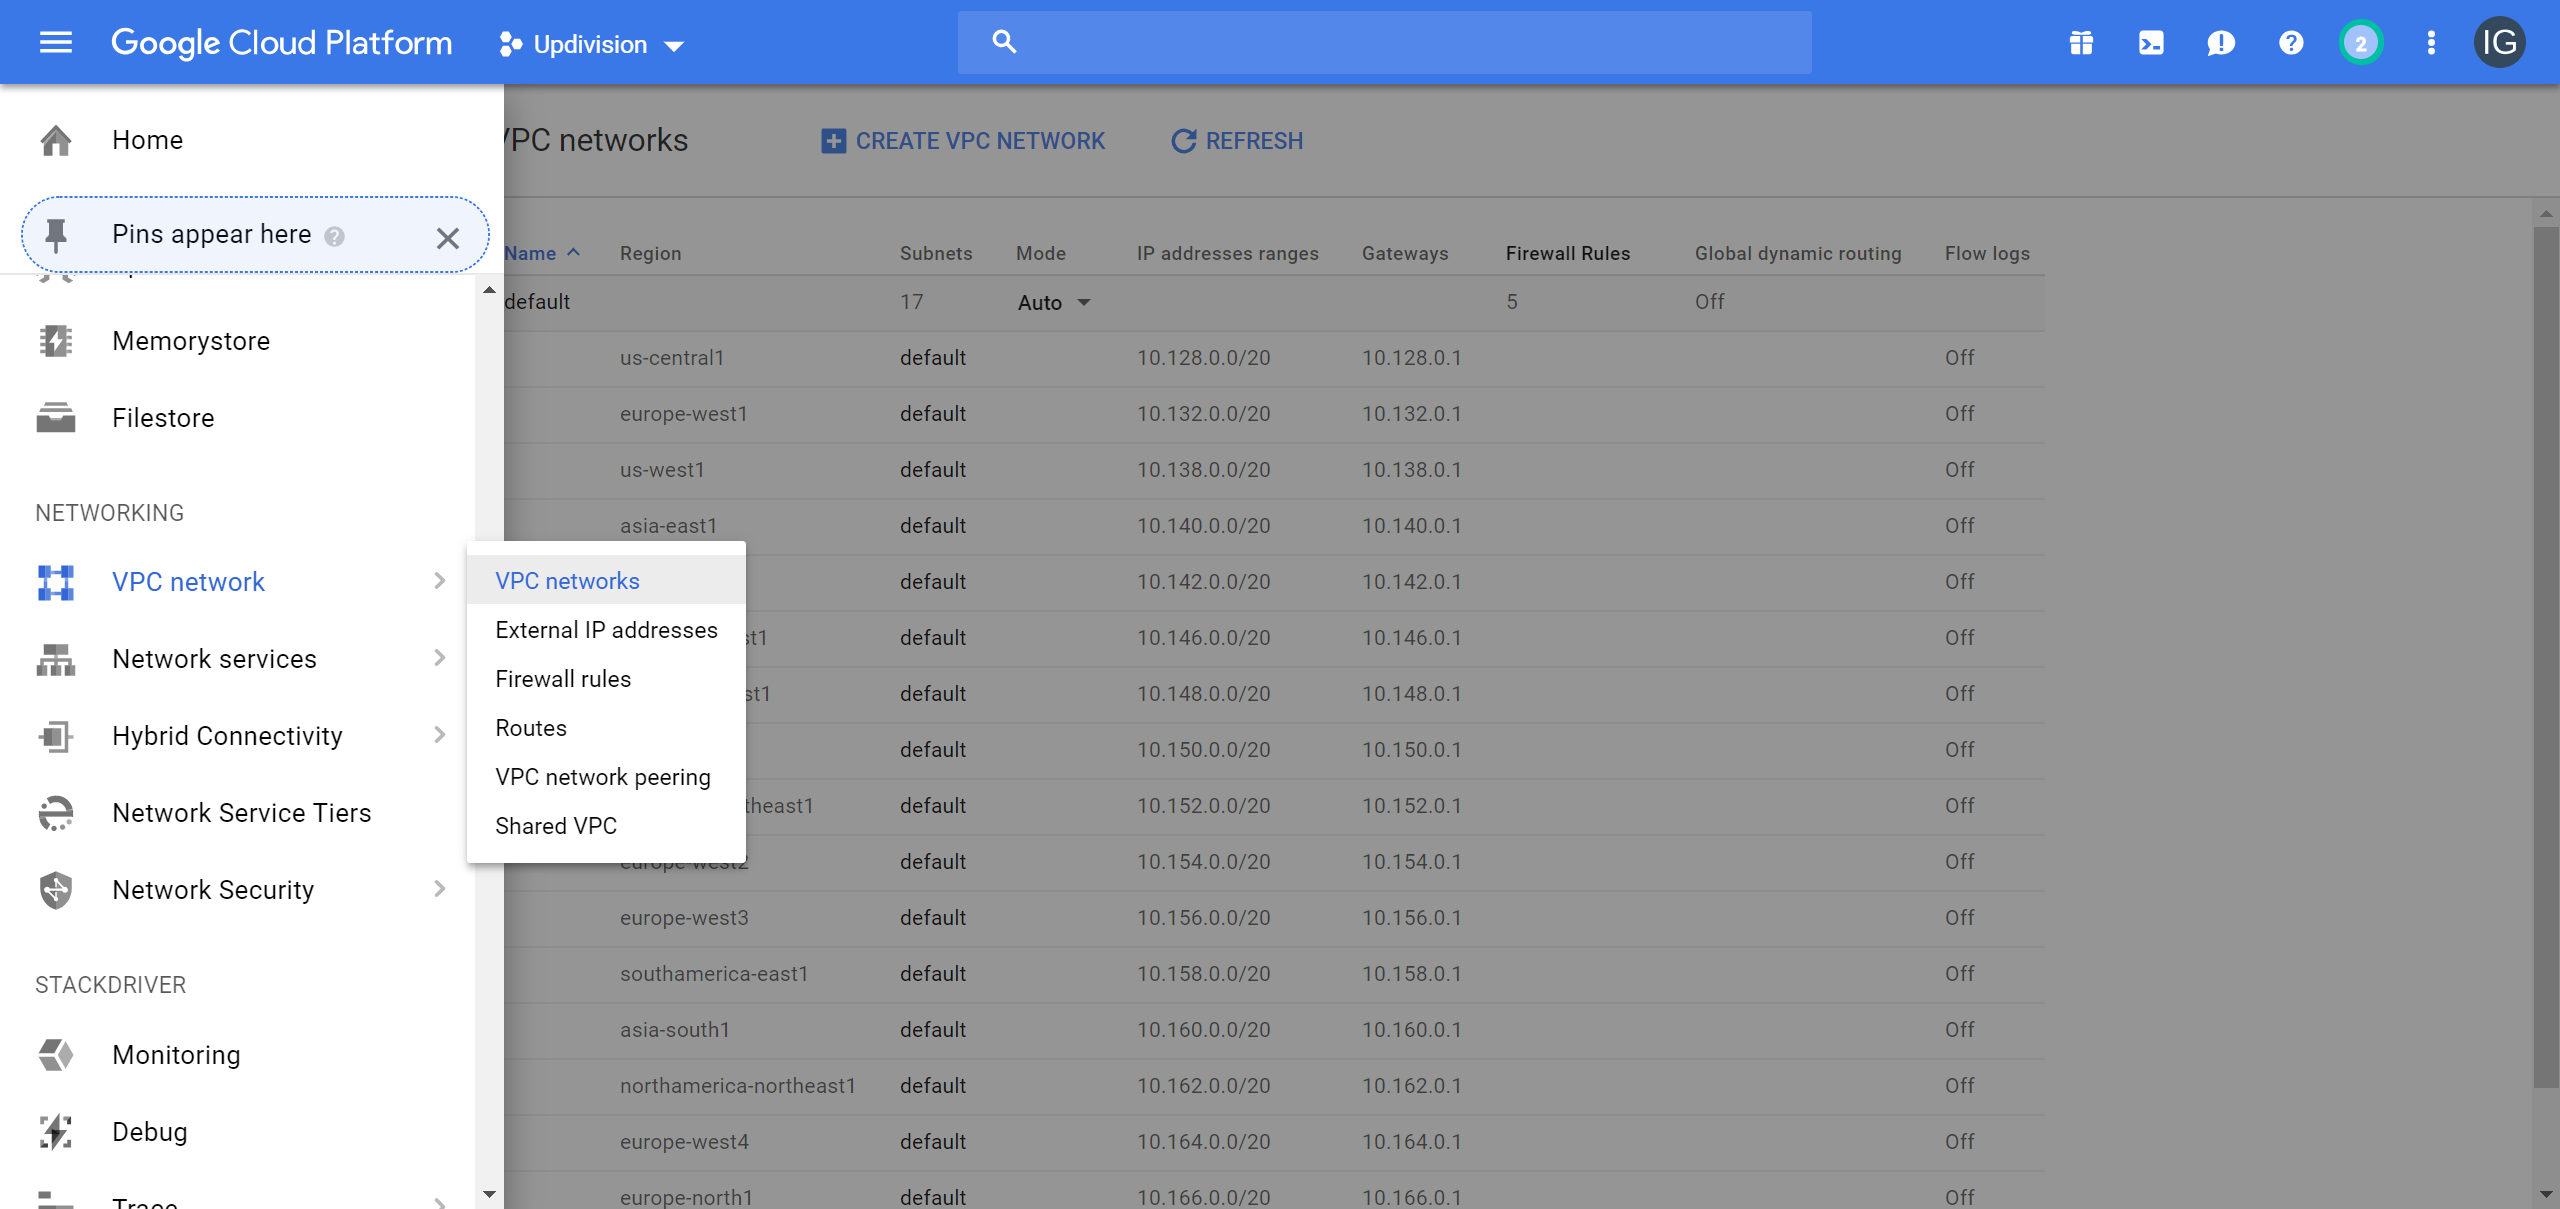
Now choose External Ip addresses and make sure your instance runs on a static IP address. If it does not reserve one

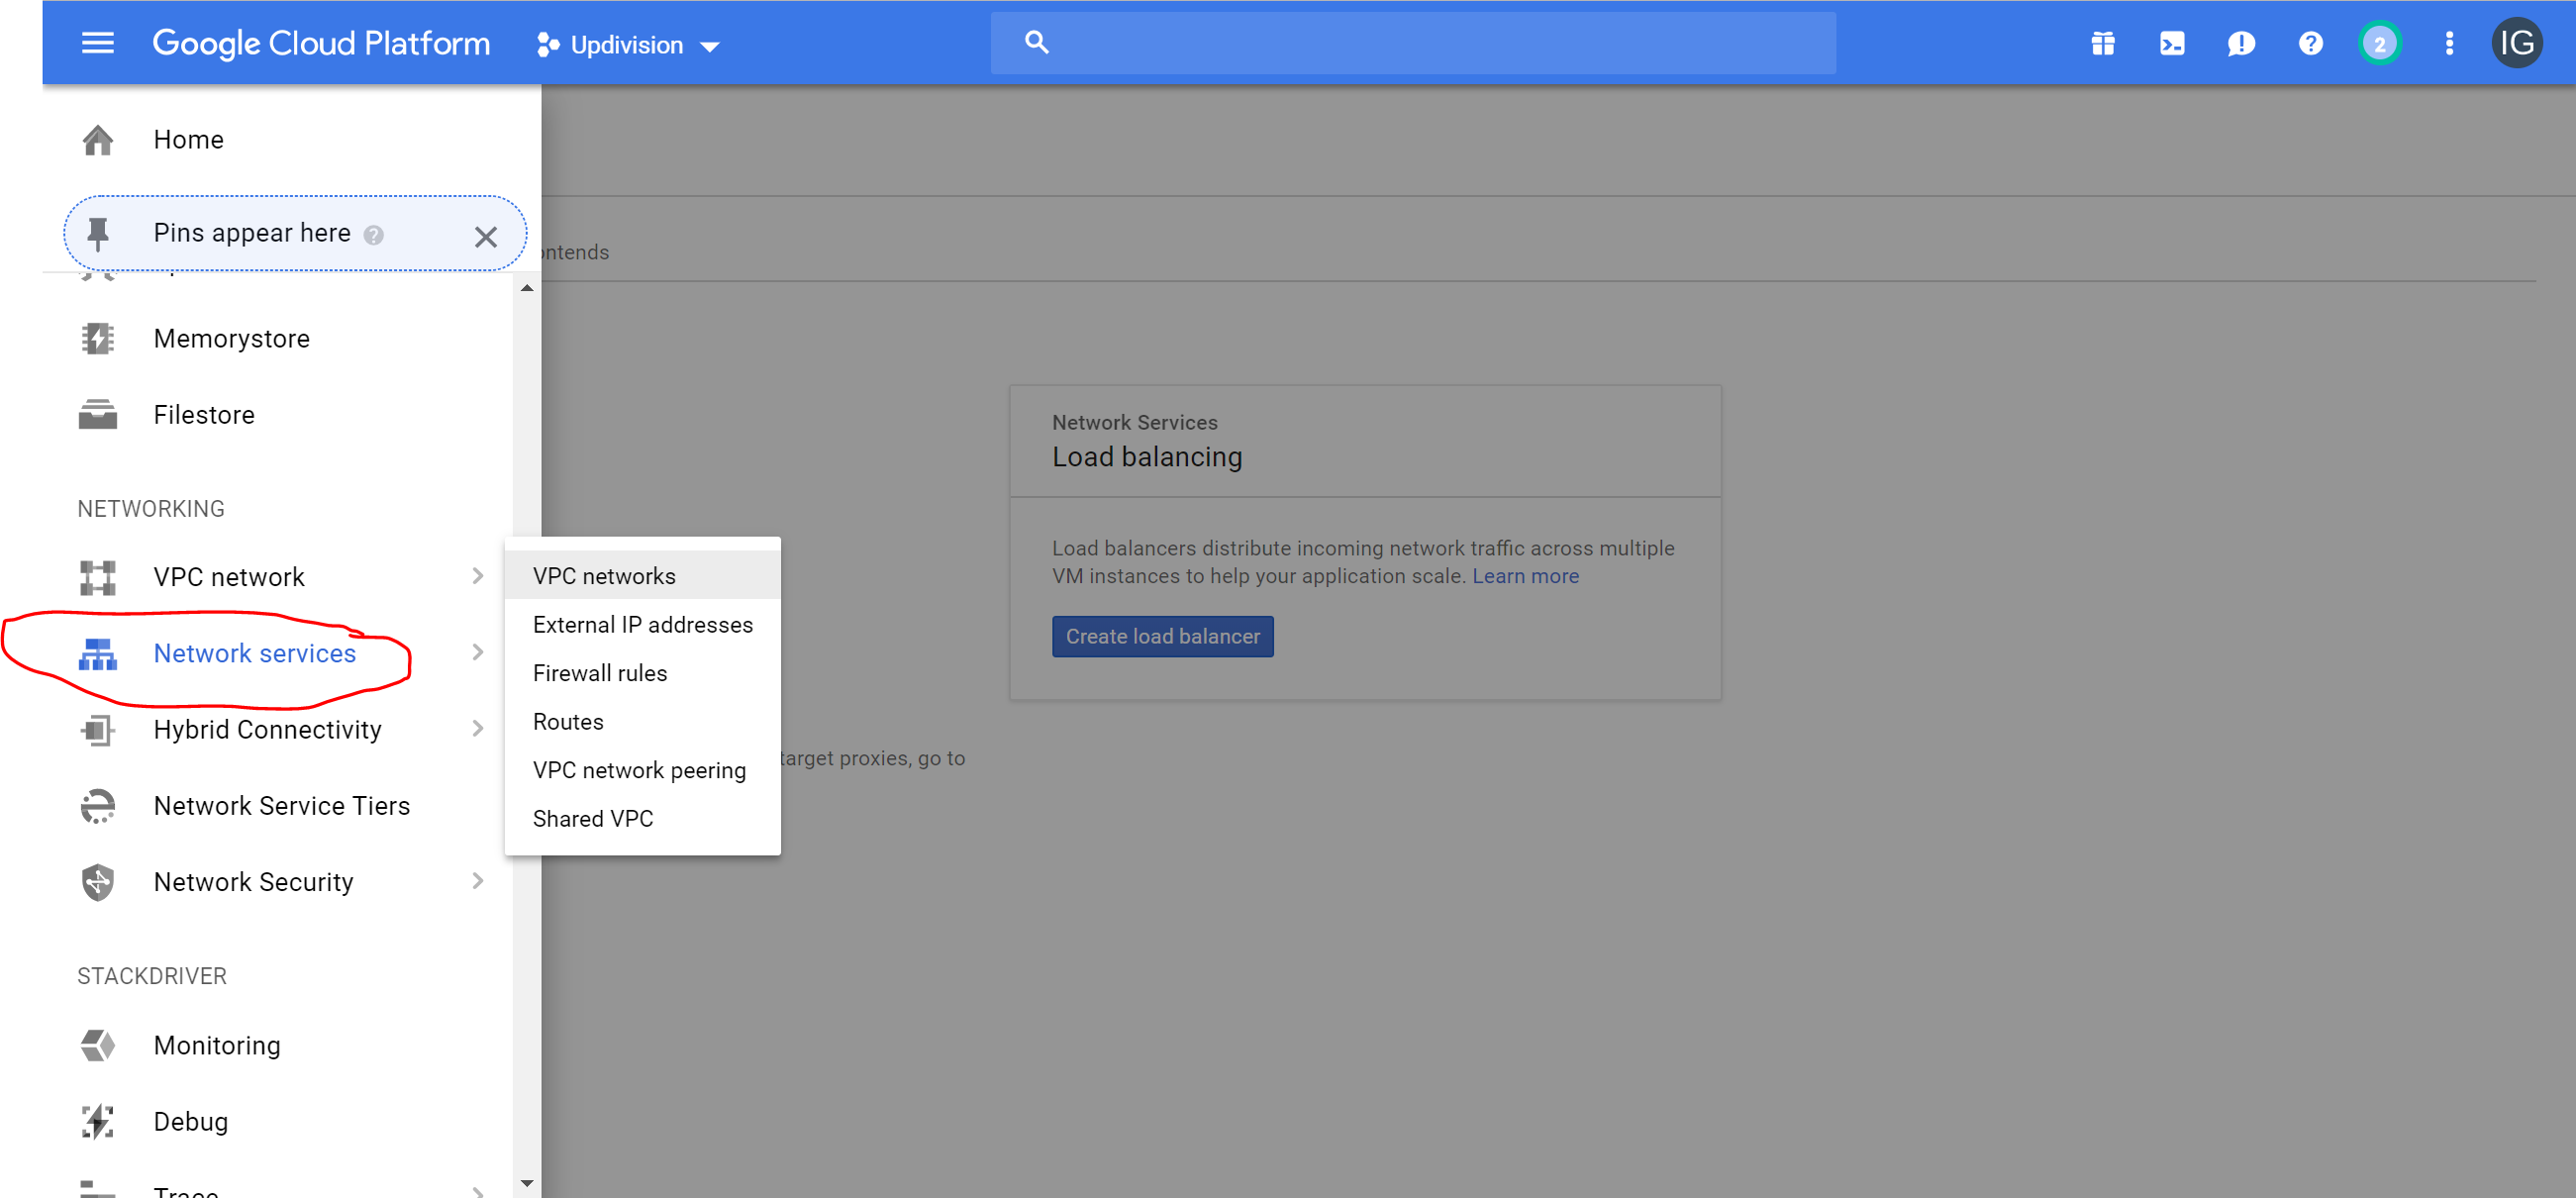
To setup the domain on an instance group you need to go on the left side menu and click on Network services
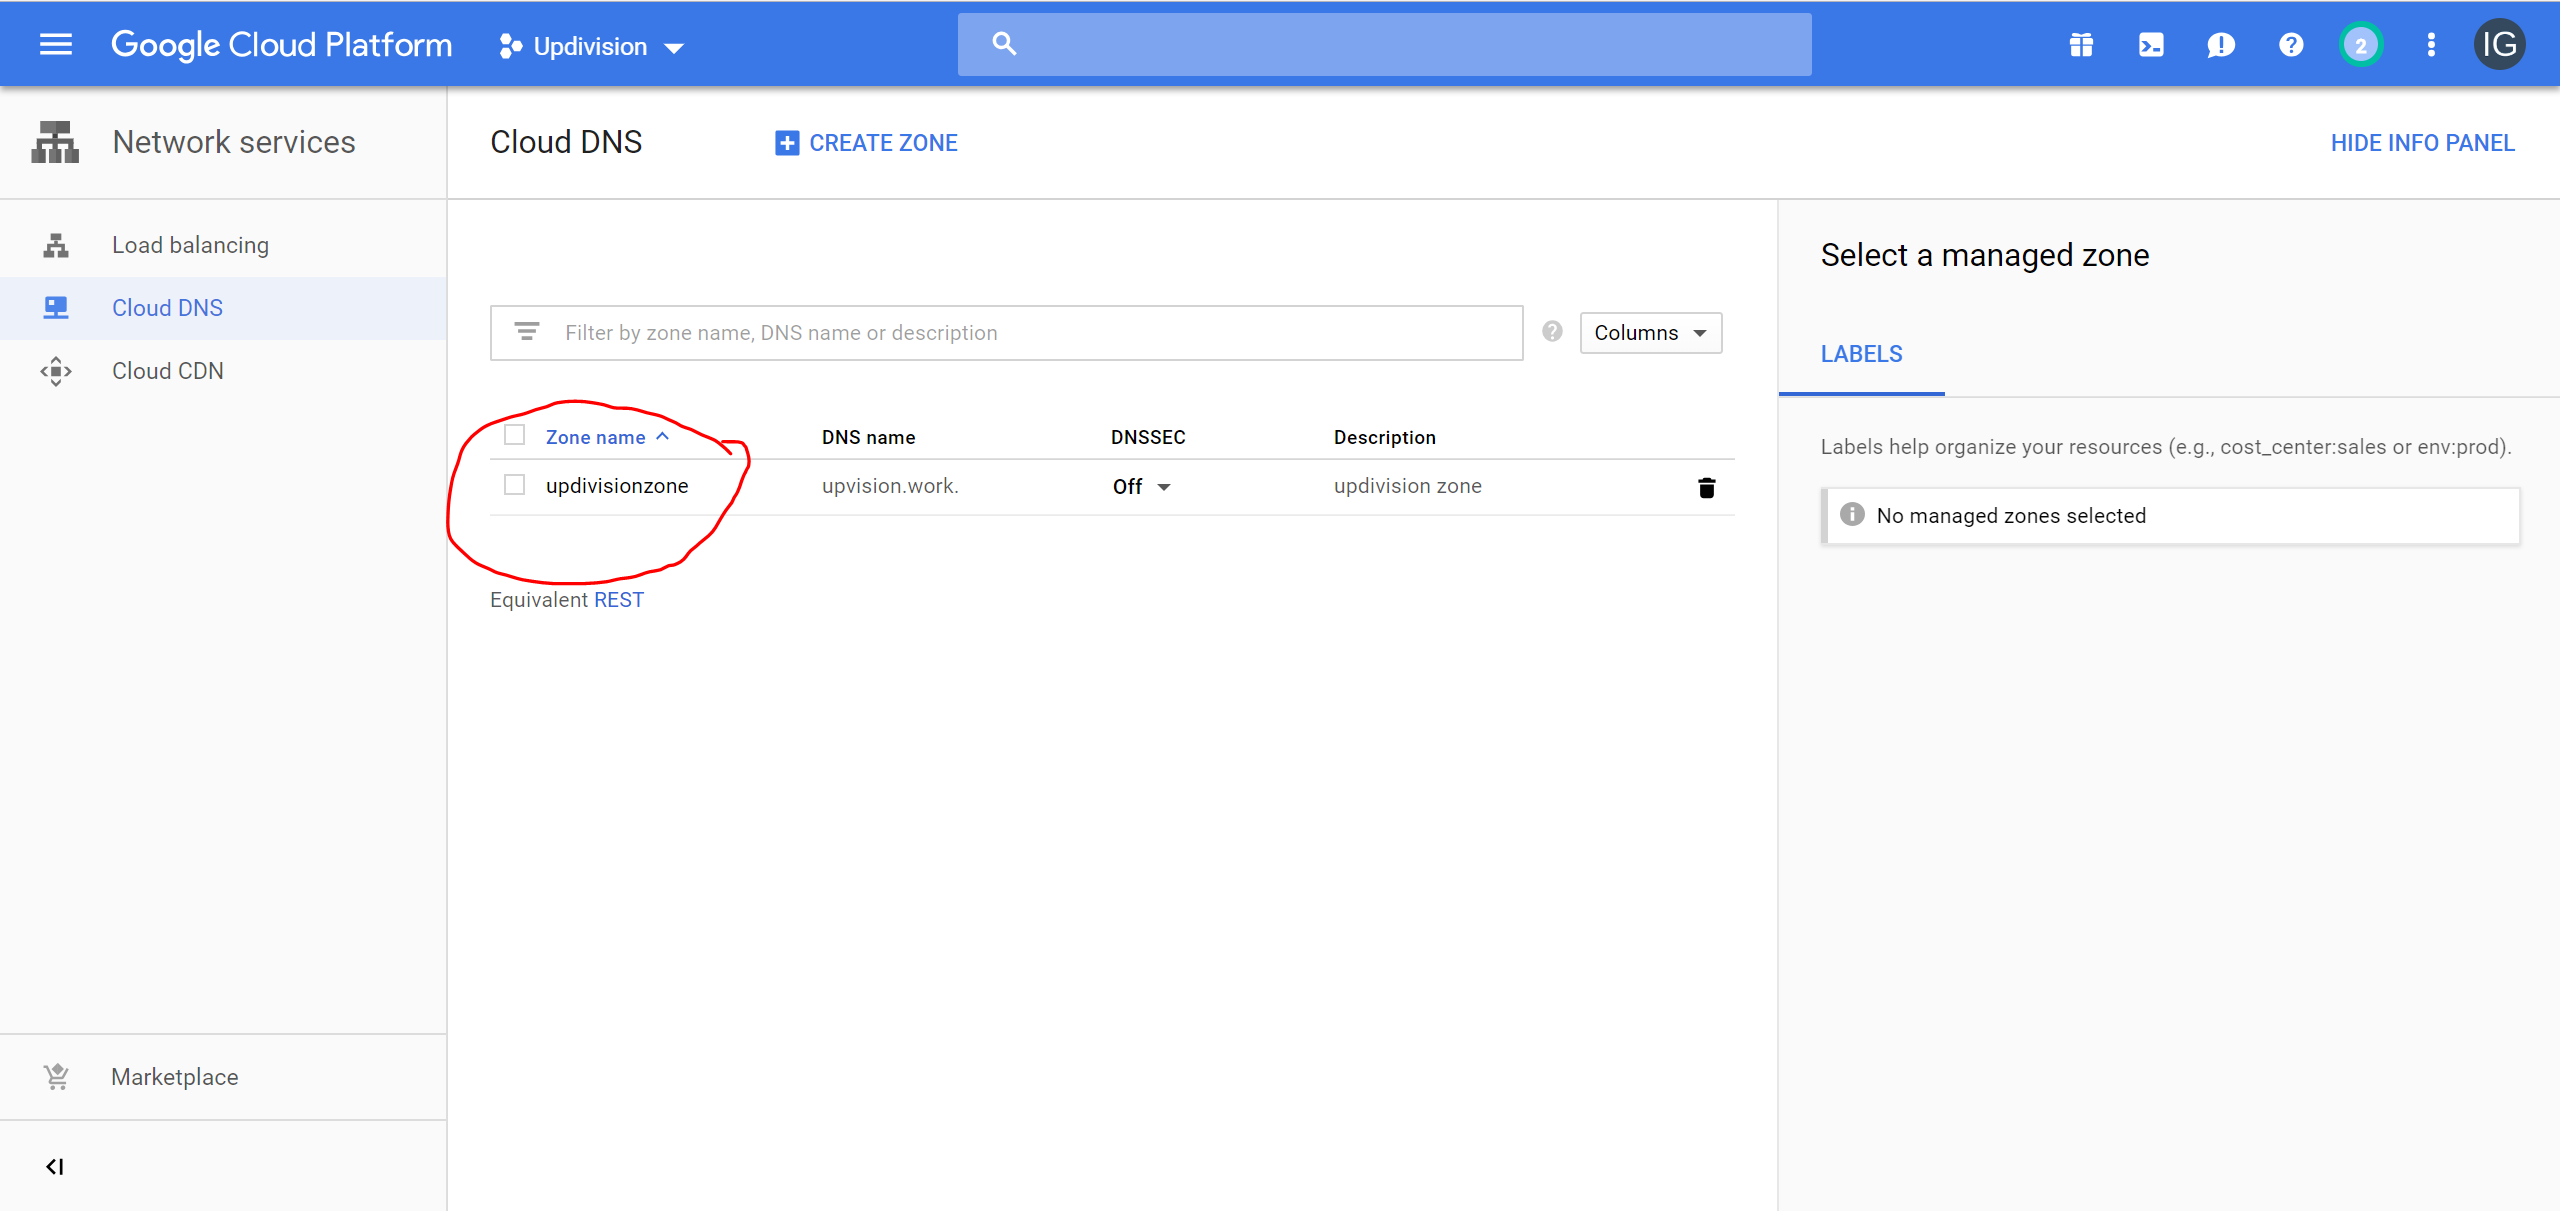
Once there in the left hand menu you need to choose Cloud DNS
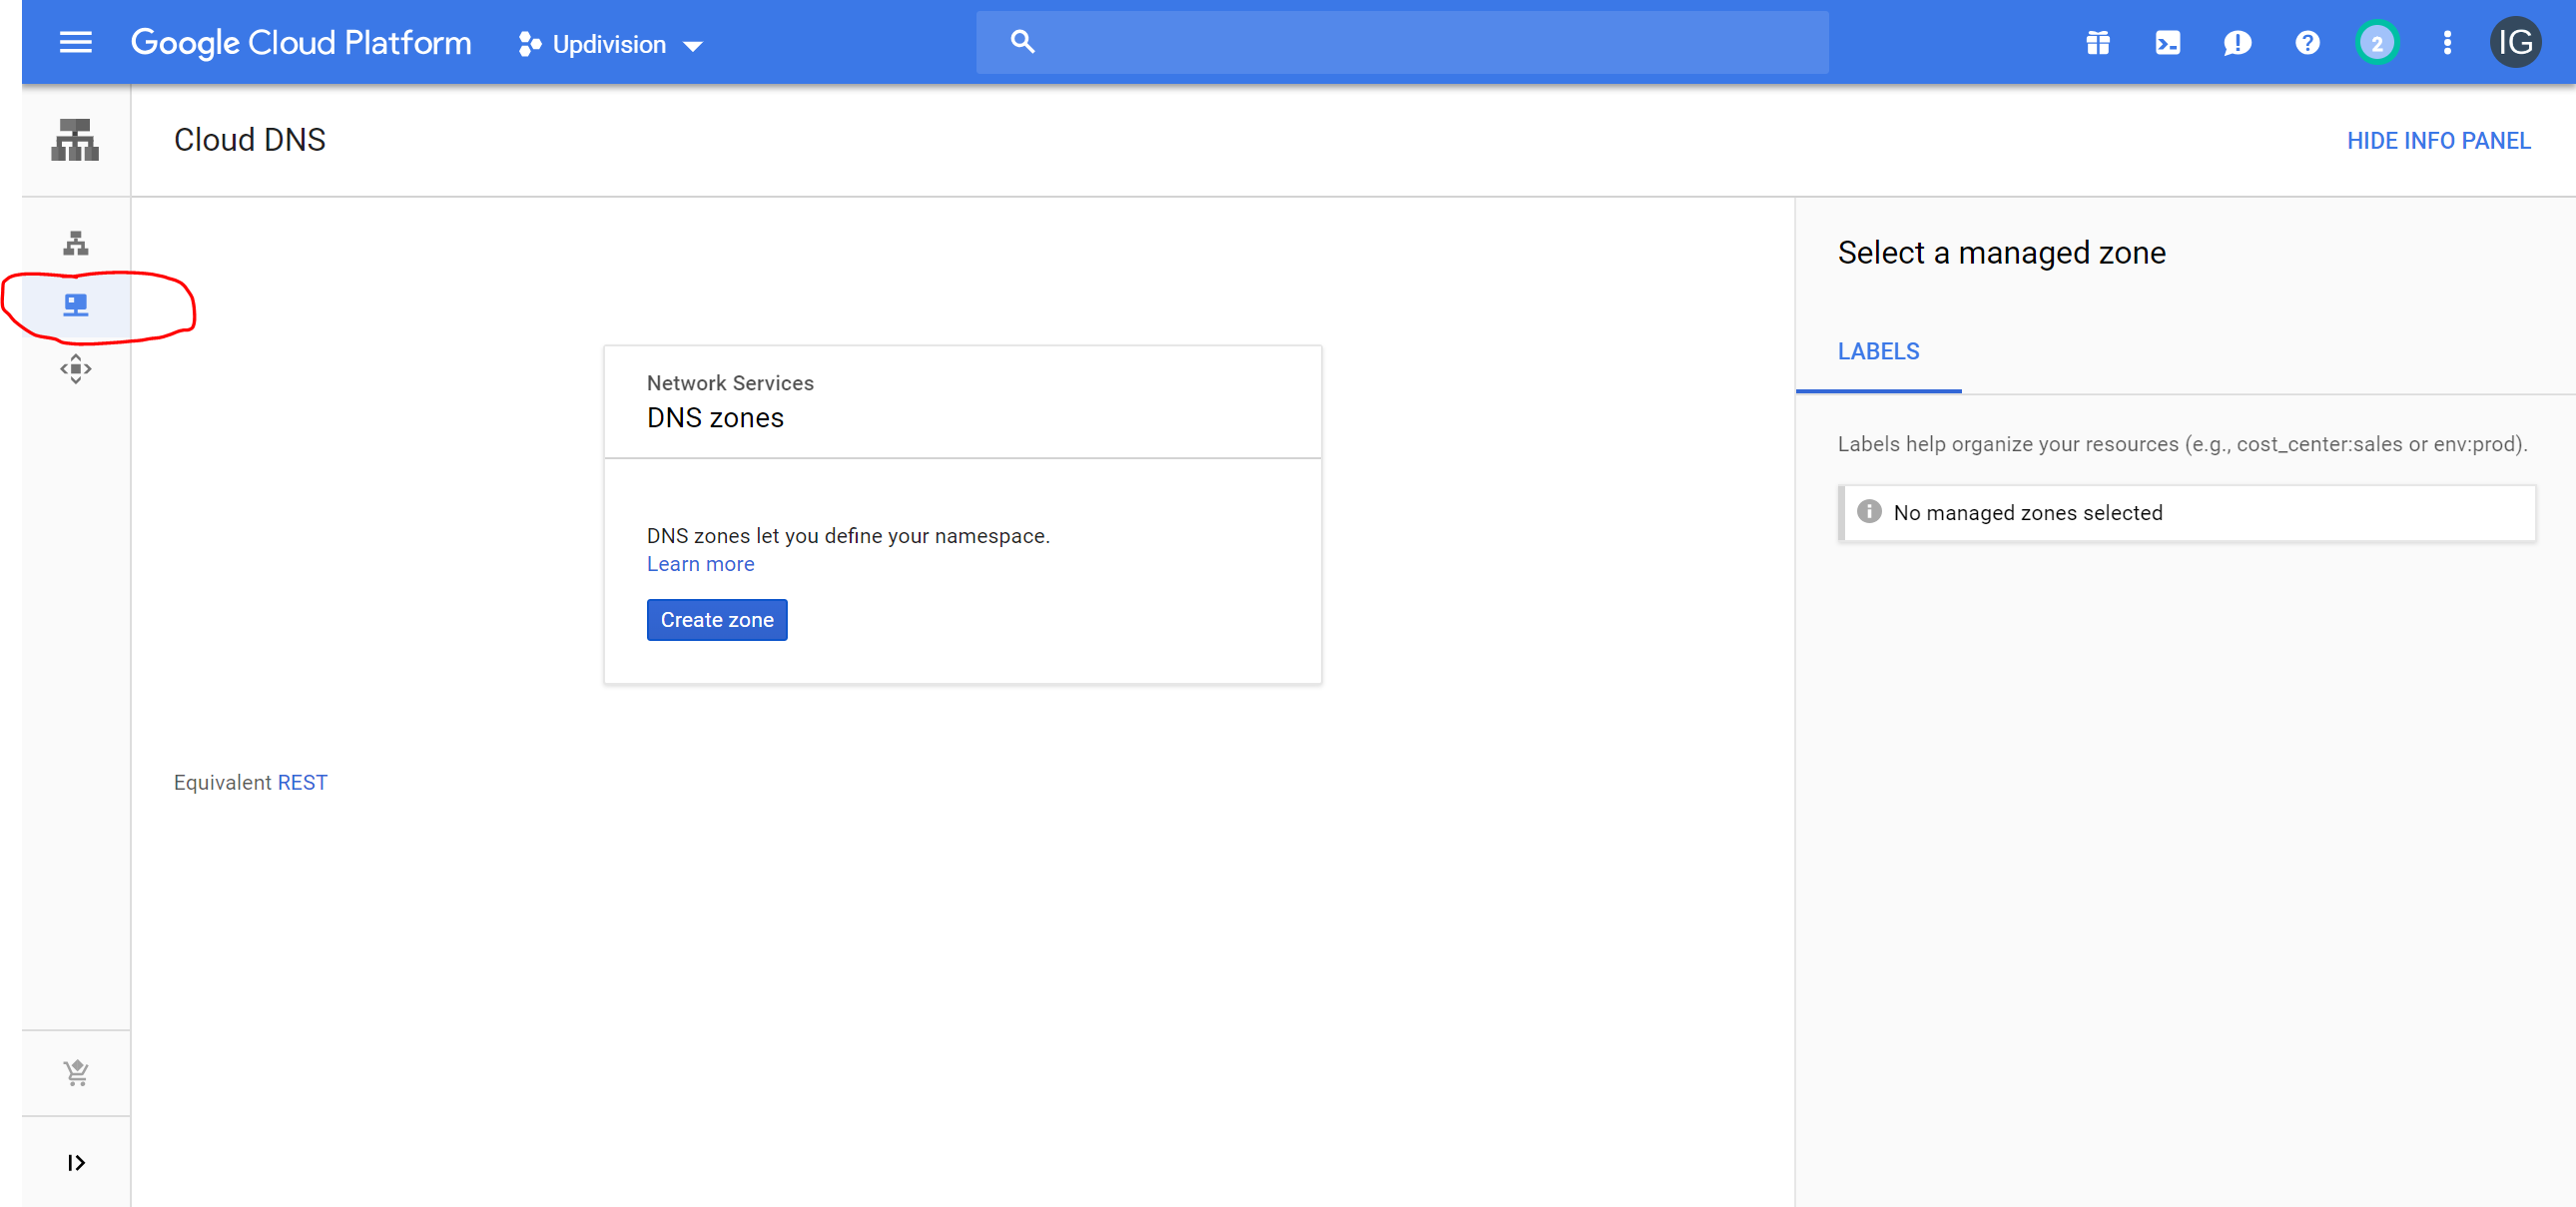
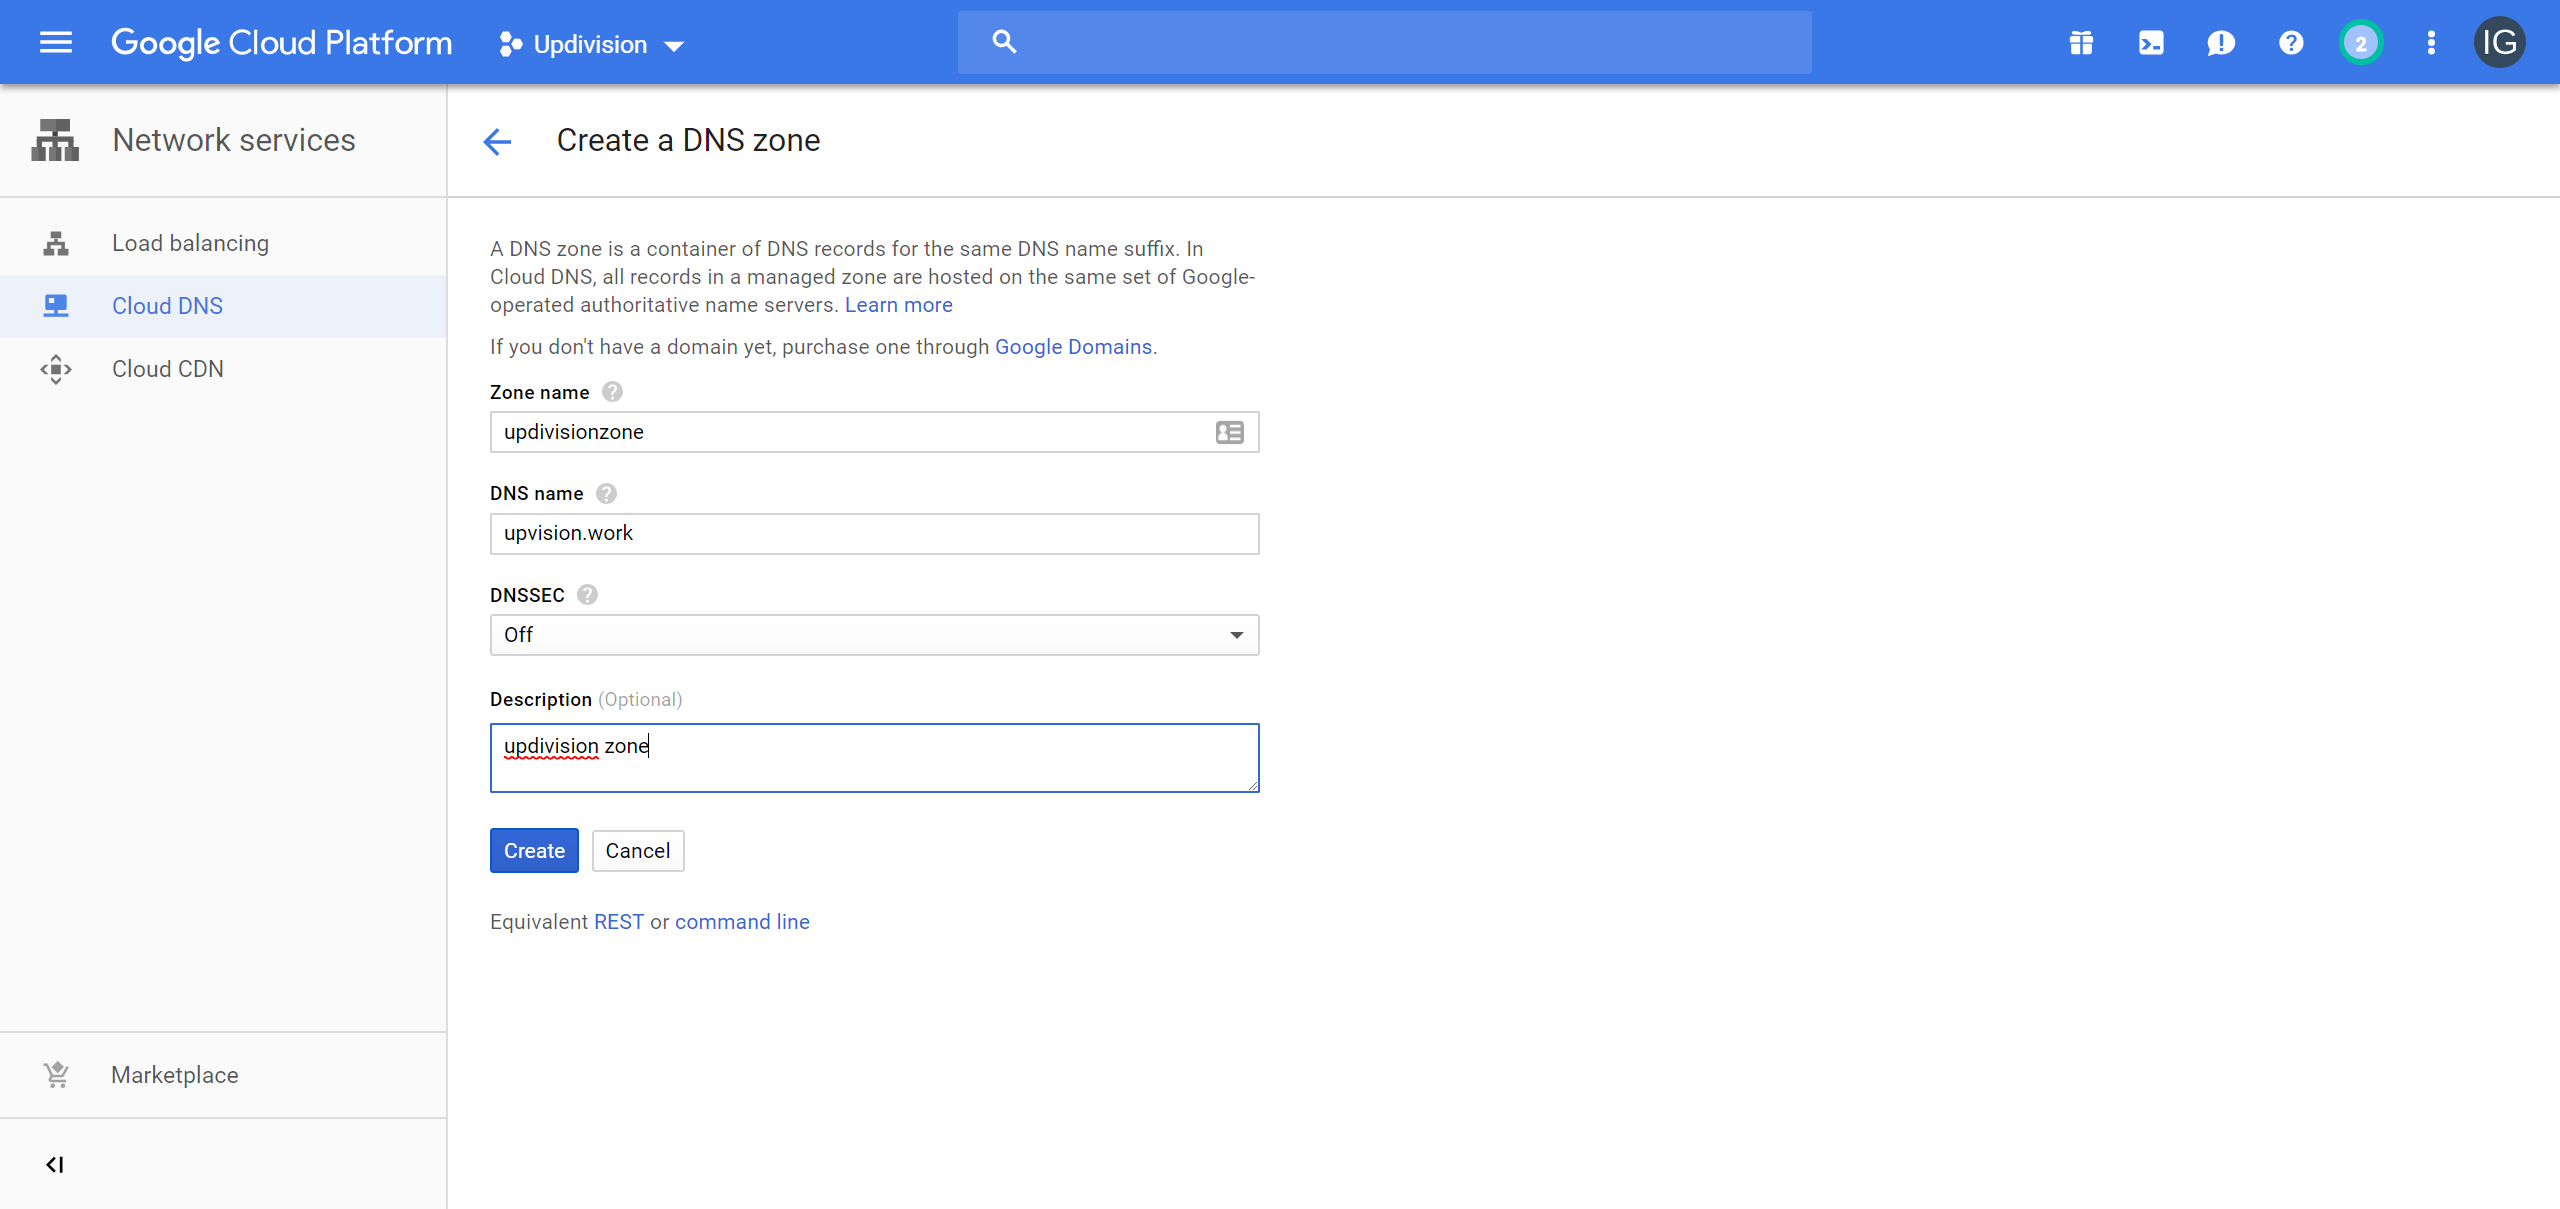
Click Create zone and complete the fields as follows:
Zone name: something to recognize that domain by
DNS Name: the domain (in my case updivision.work. Do not add a subdomain. We will do that later)
DNSSEC: I set it to off, but you can read more info by clicking on the question mark next to the input
Description: optional, something to describe your zone
Click Create
Then we need to create a record to connect the IP address we reserved to the domain we’re setting up. Click on the name of your zone and then Add record set at the top of the page.
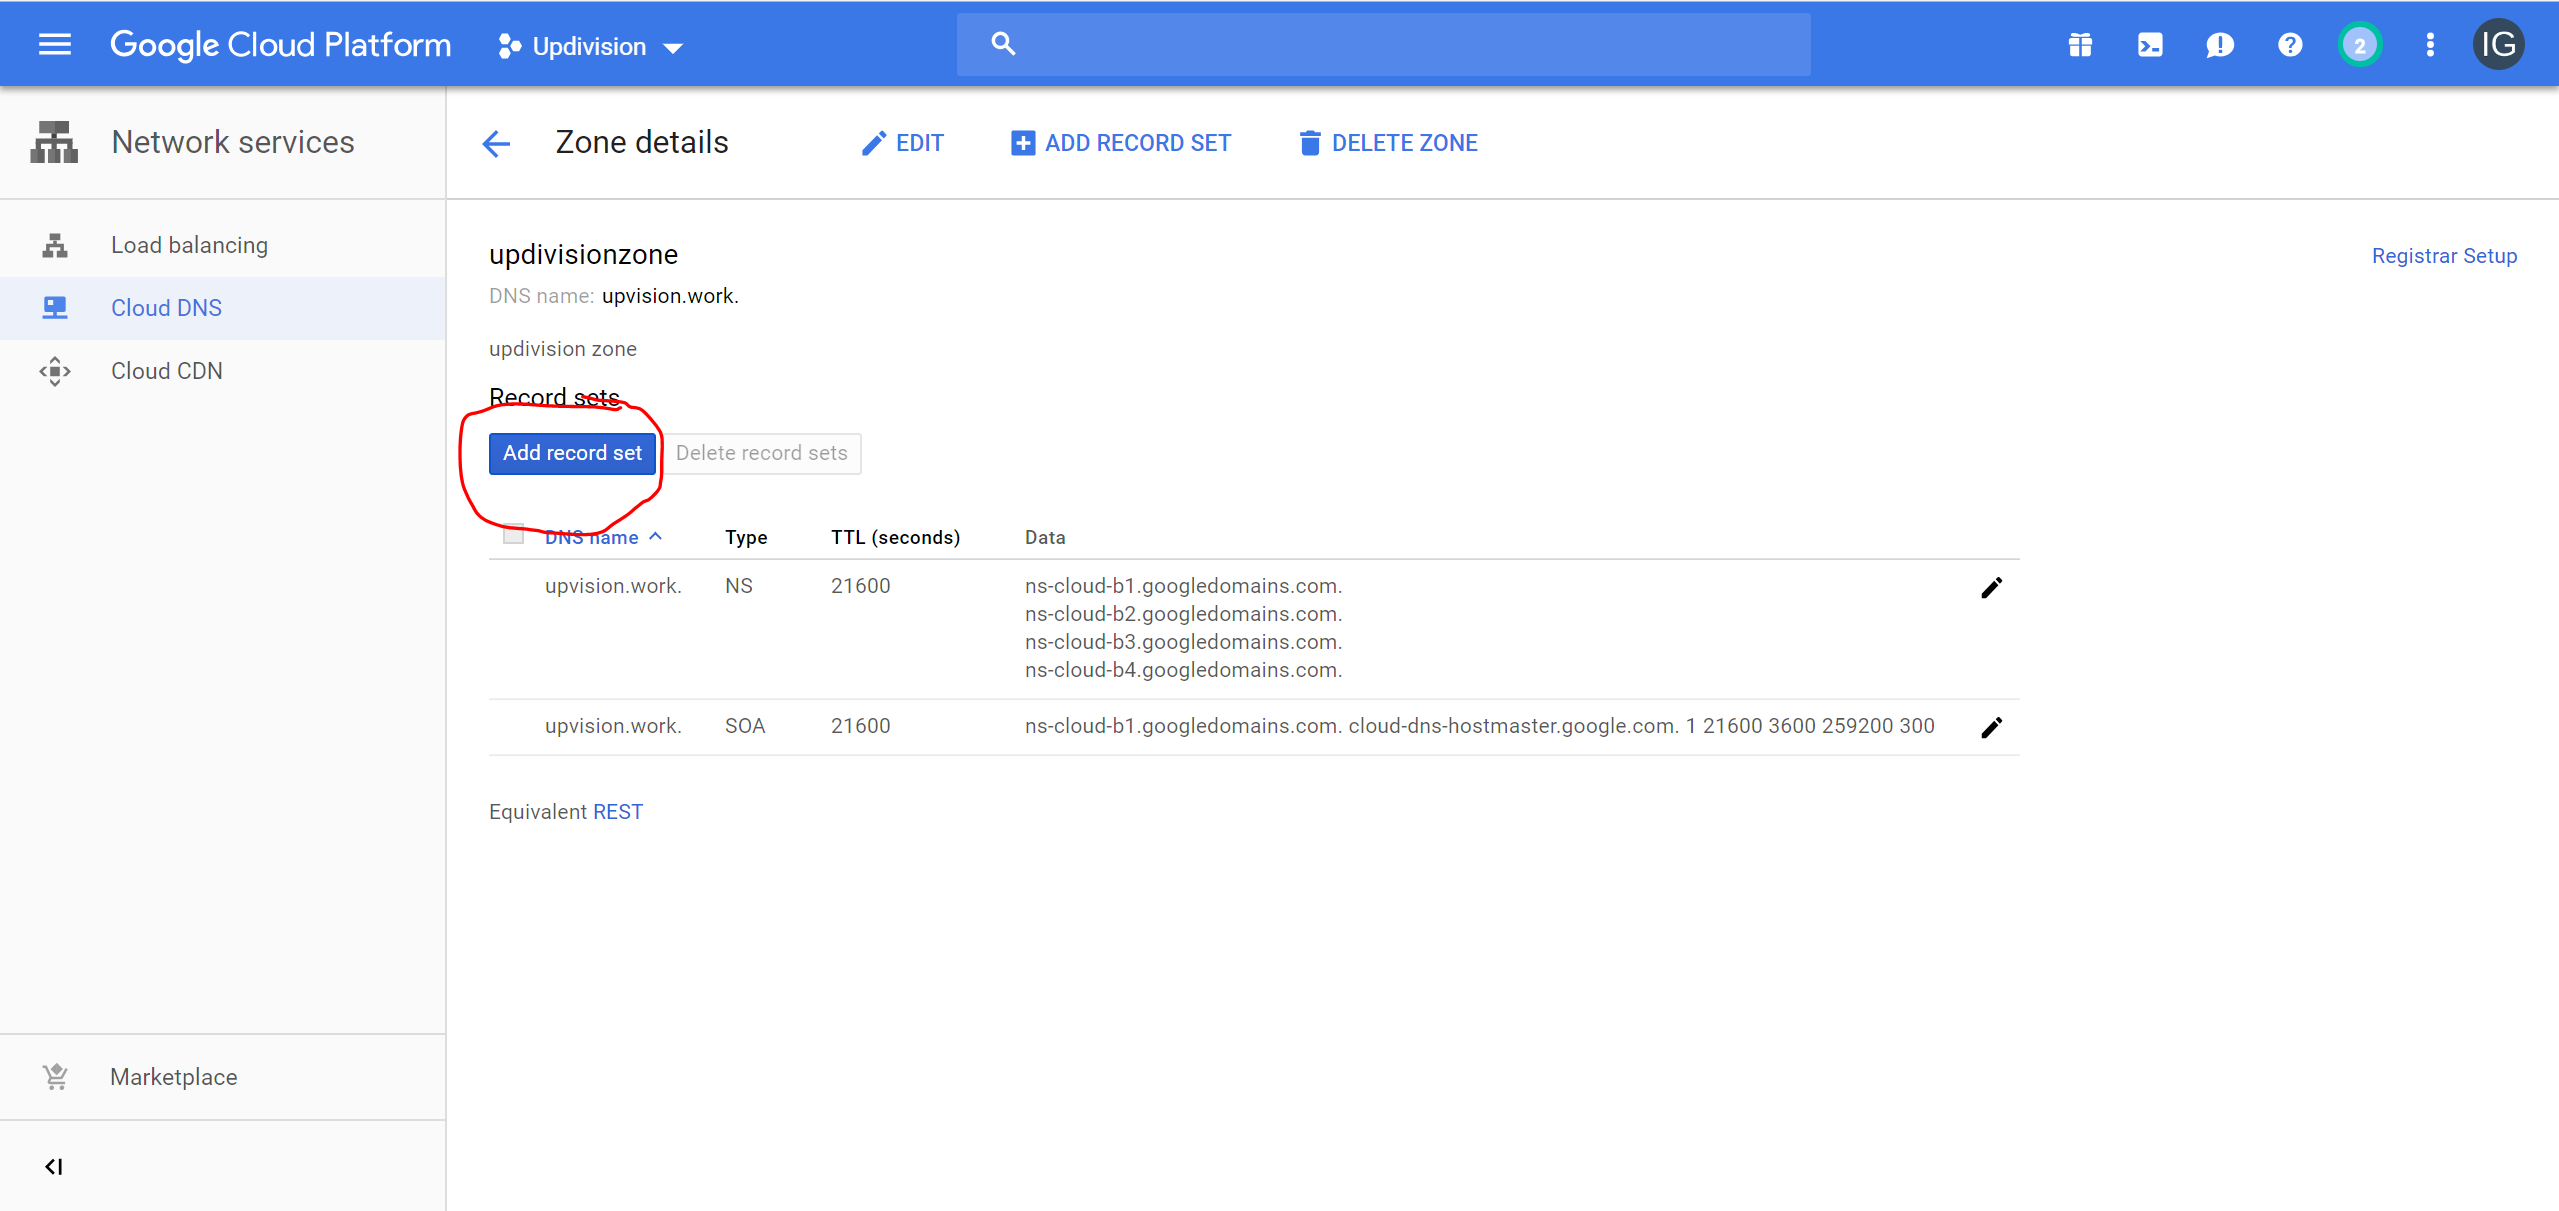
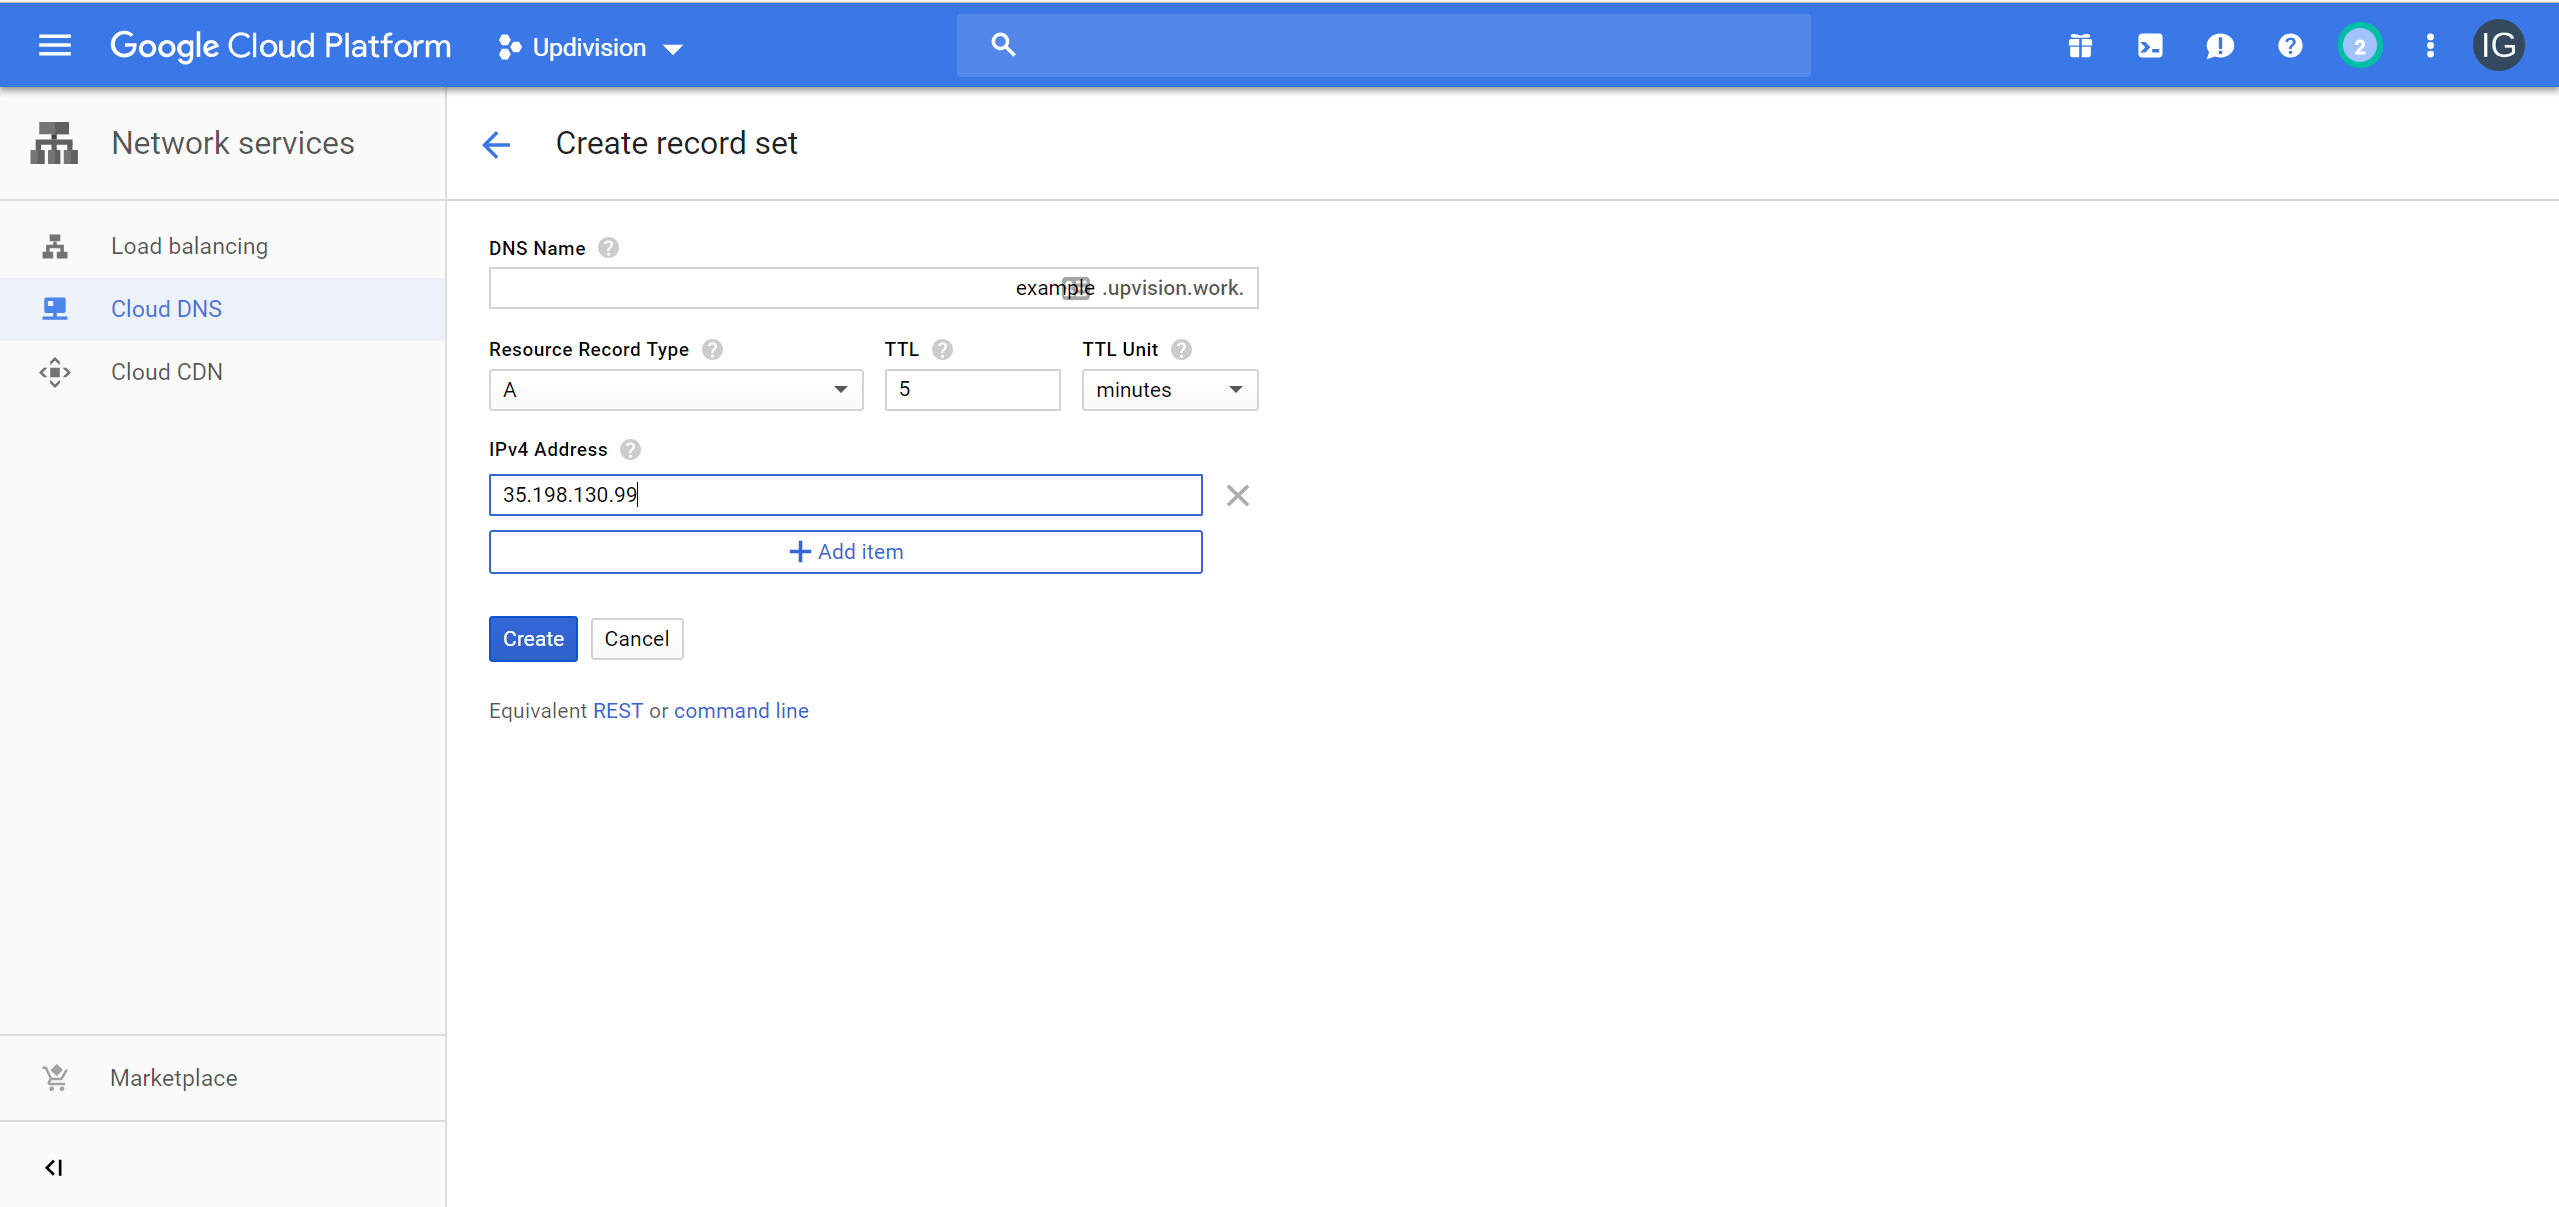
Add an A record. Copy the IP of the instance and paste it in the IPv4 Address input. If you want to use a subdomain add it in DNS Name input.
Once you click create go to your domain seller and setup the nameservers (custom DNS) with the entries you got from google.
Since I use sparkpost to send email and google email service to receive them on most of the domains I set up I don’t need to setup any record for the email service since I will be using the api provided programmatically, but you can always setup the email by adding the needed records.
SSL
As said before you can install letsencrypt with certbot if you only need one instance (which will most likely be the case if you set up a small website or a test environment). However I will continue with load balancing in this chapter in case you aim for a production environment.
Go in the left side menu and click Network services and this time choose Load Balancing.
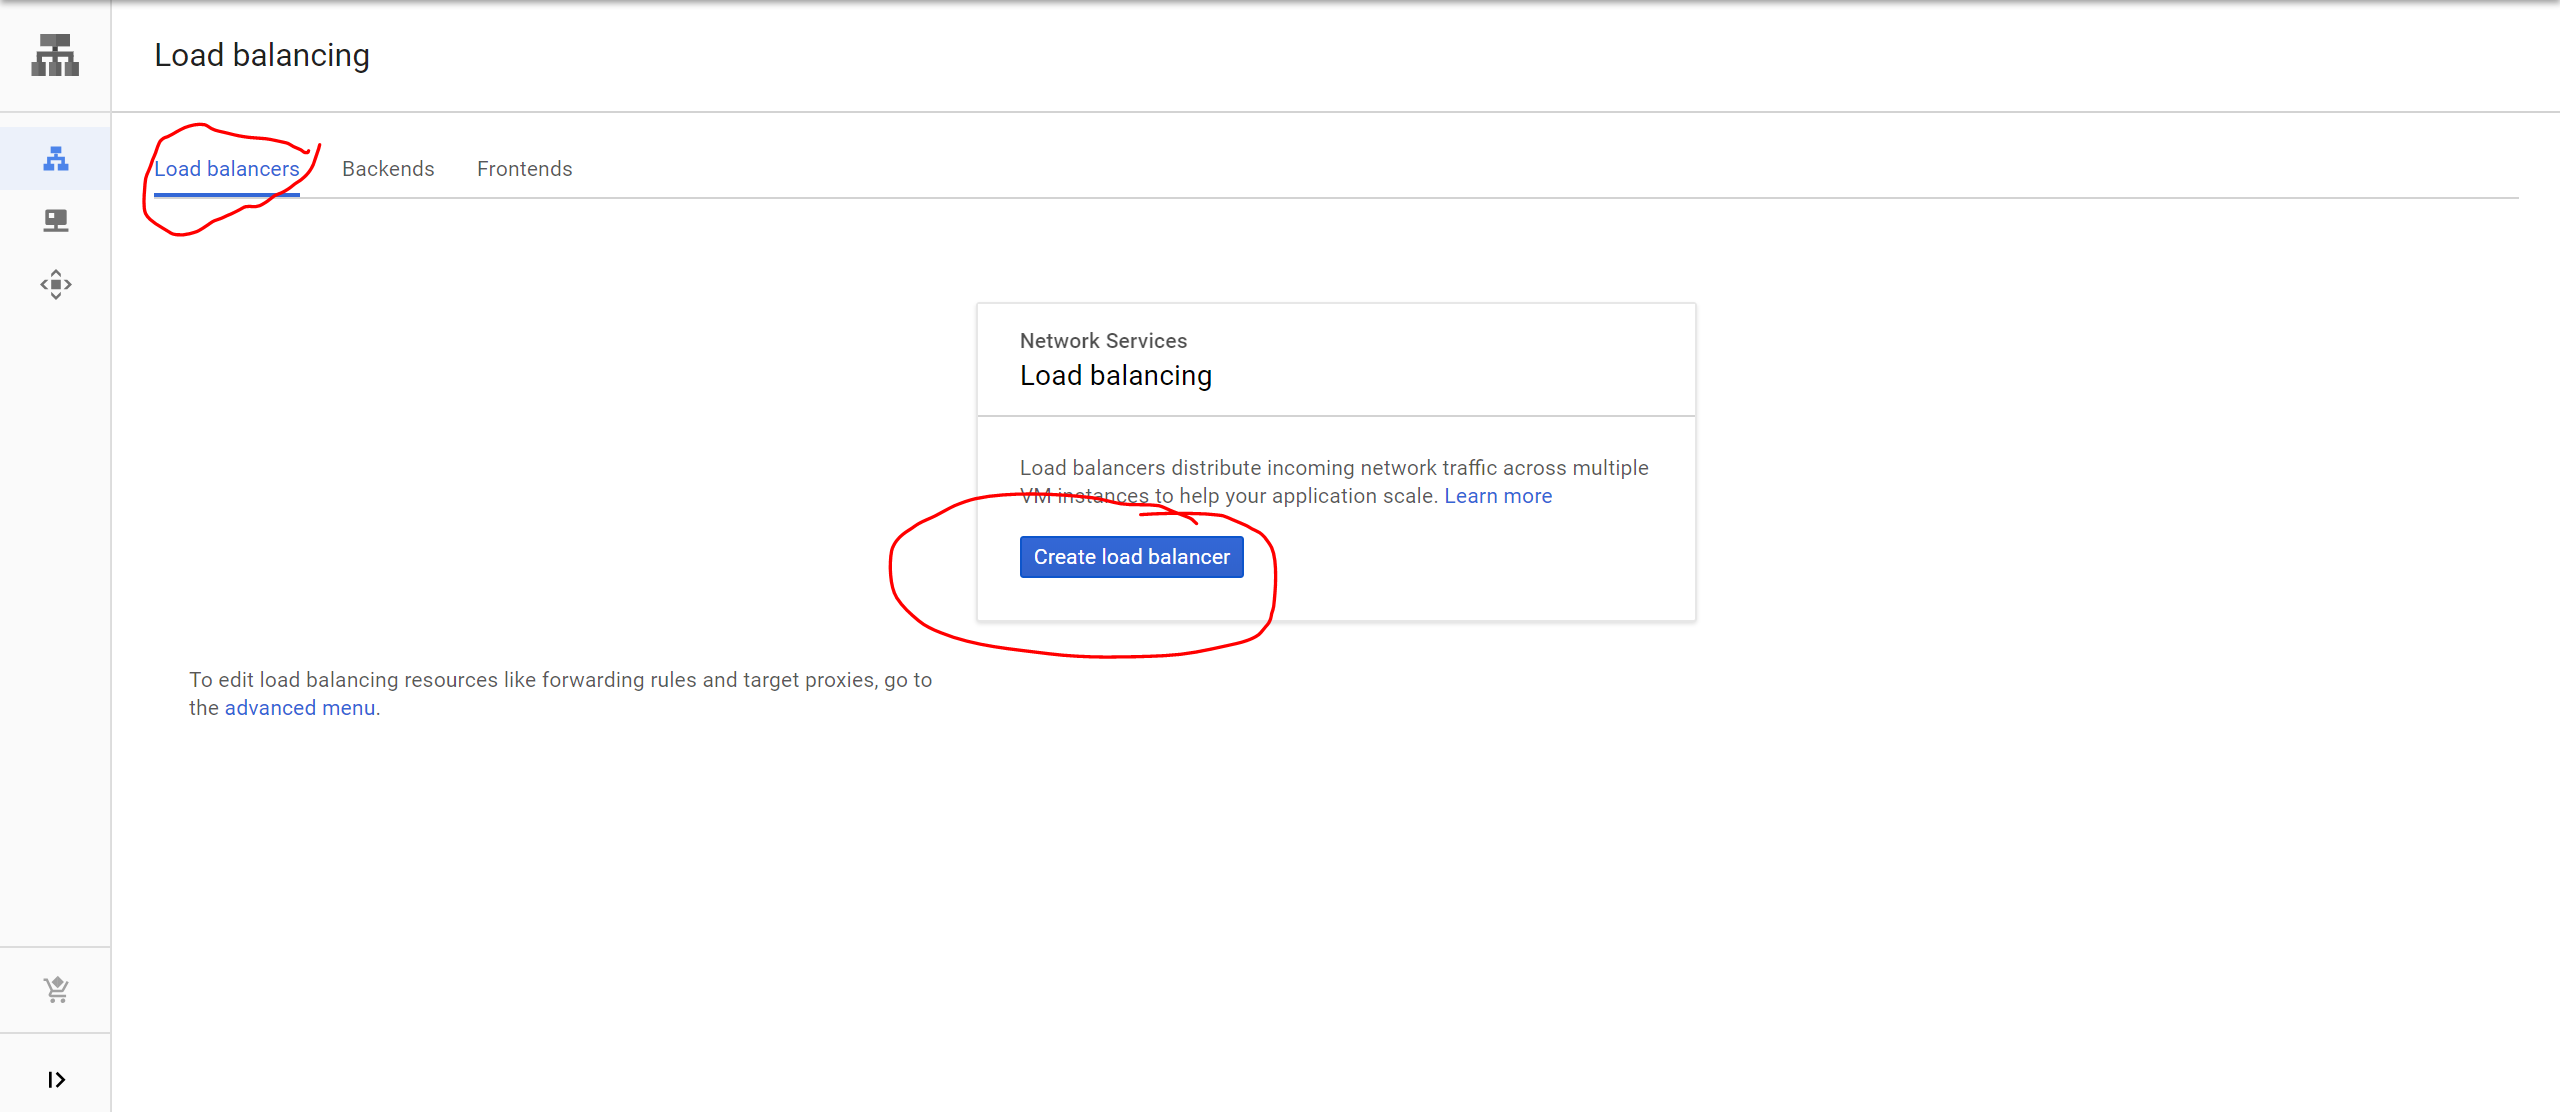
Click Create load balancer. In the next screen choose HTTP(S) Load Balancing. For more information you can follow this link:
https://cloud.google.com/load-balancing/docs/https/
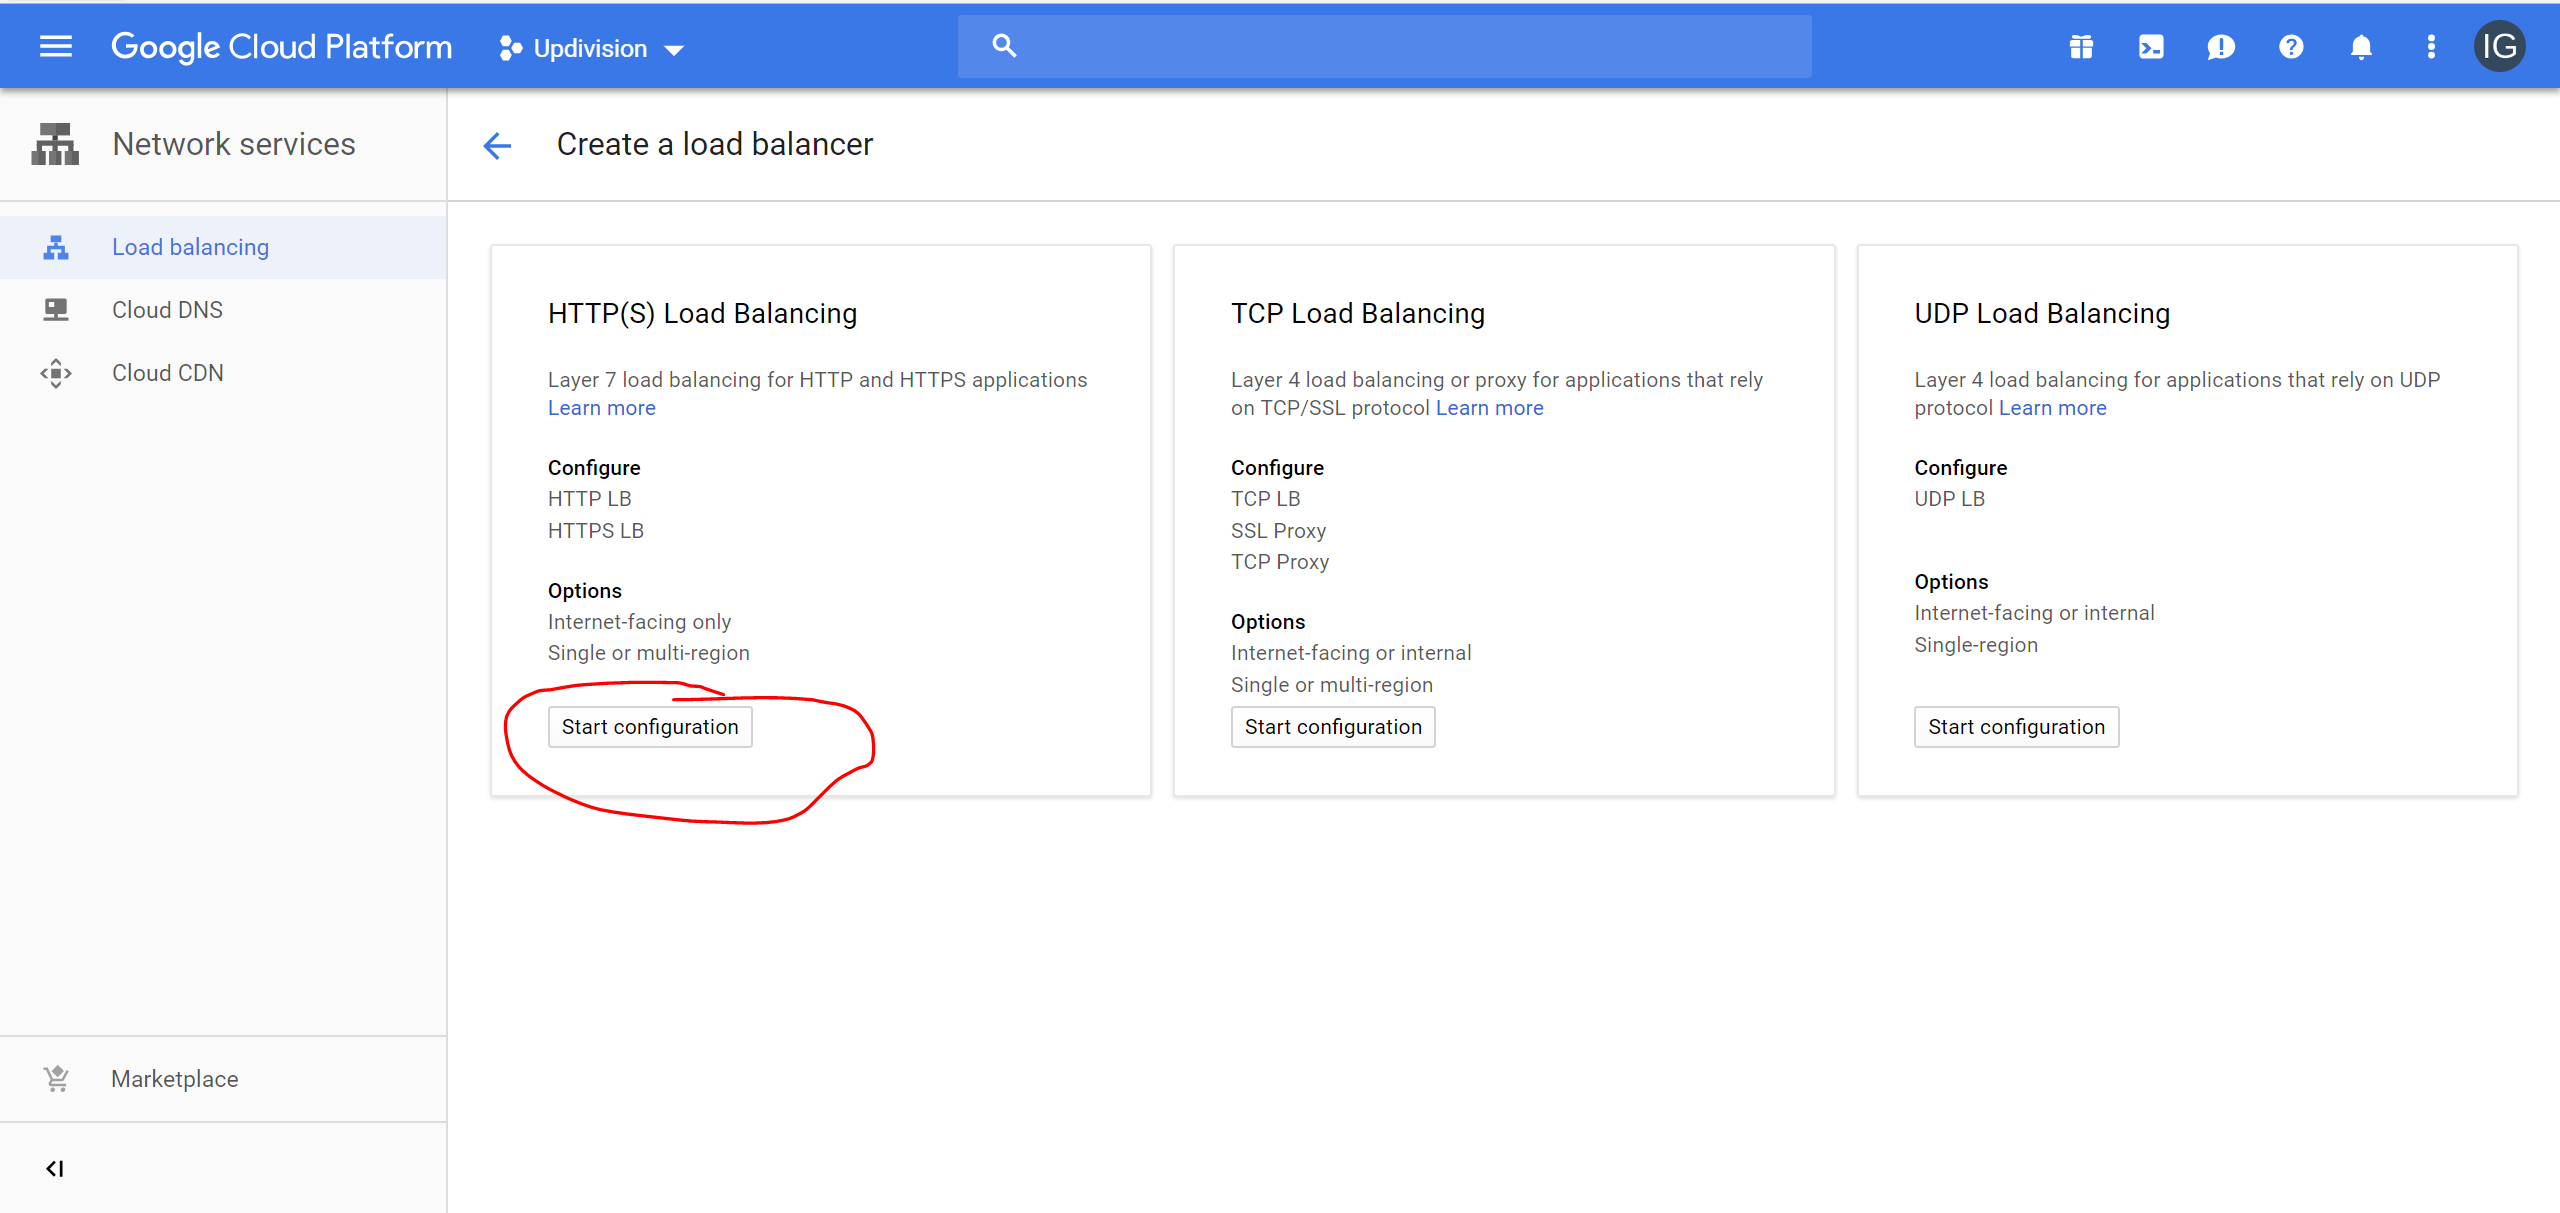
Click Start configuration
Give it a name and click on backend configuration.
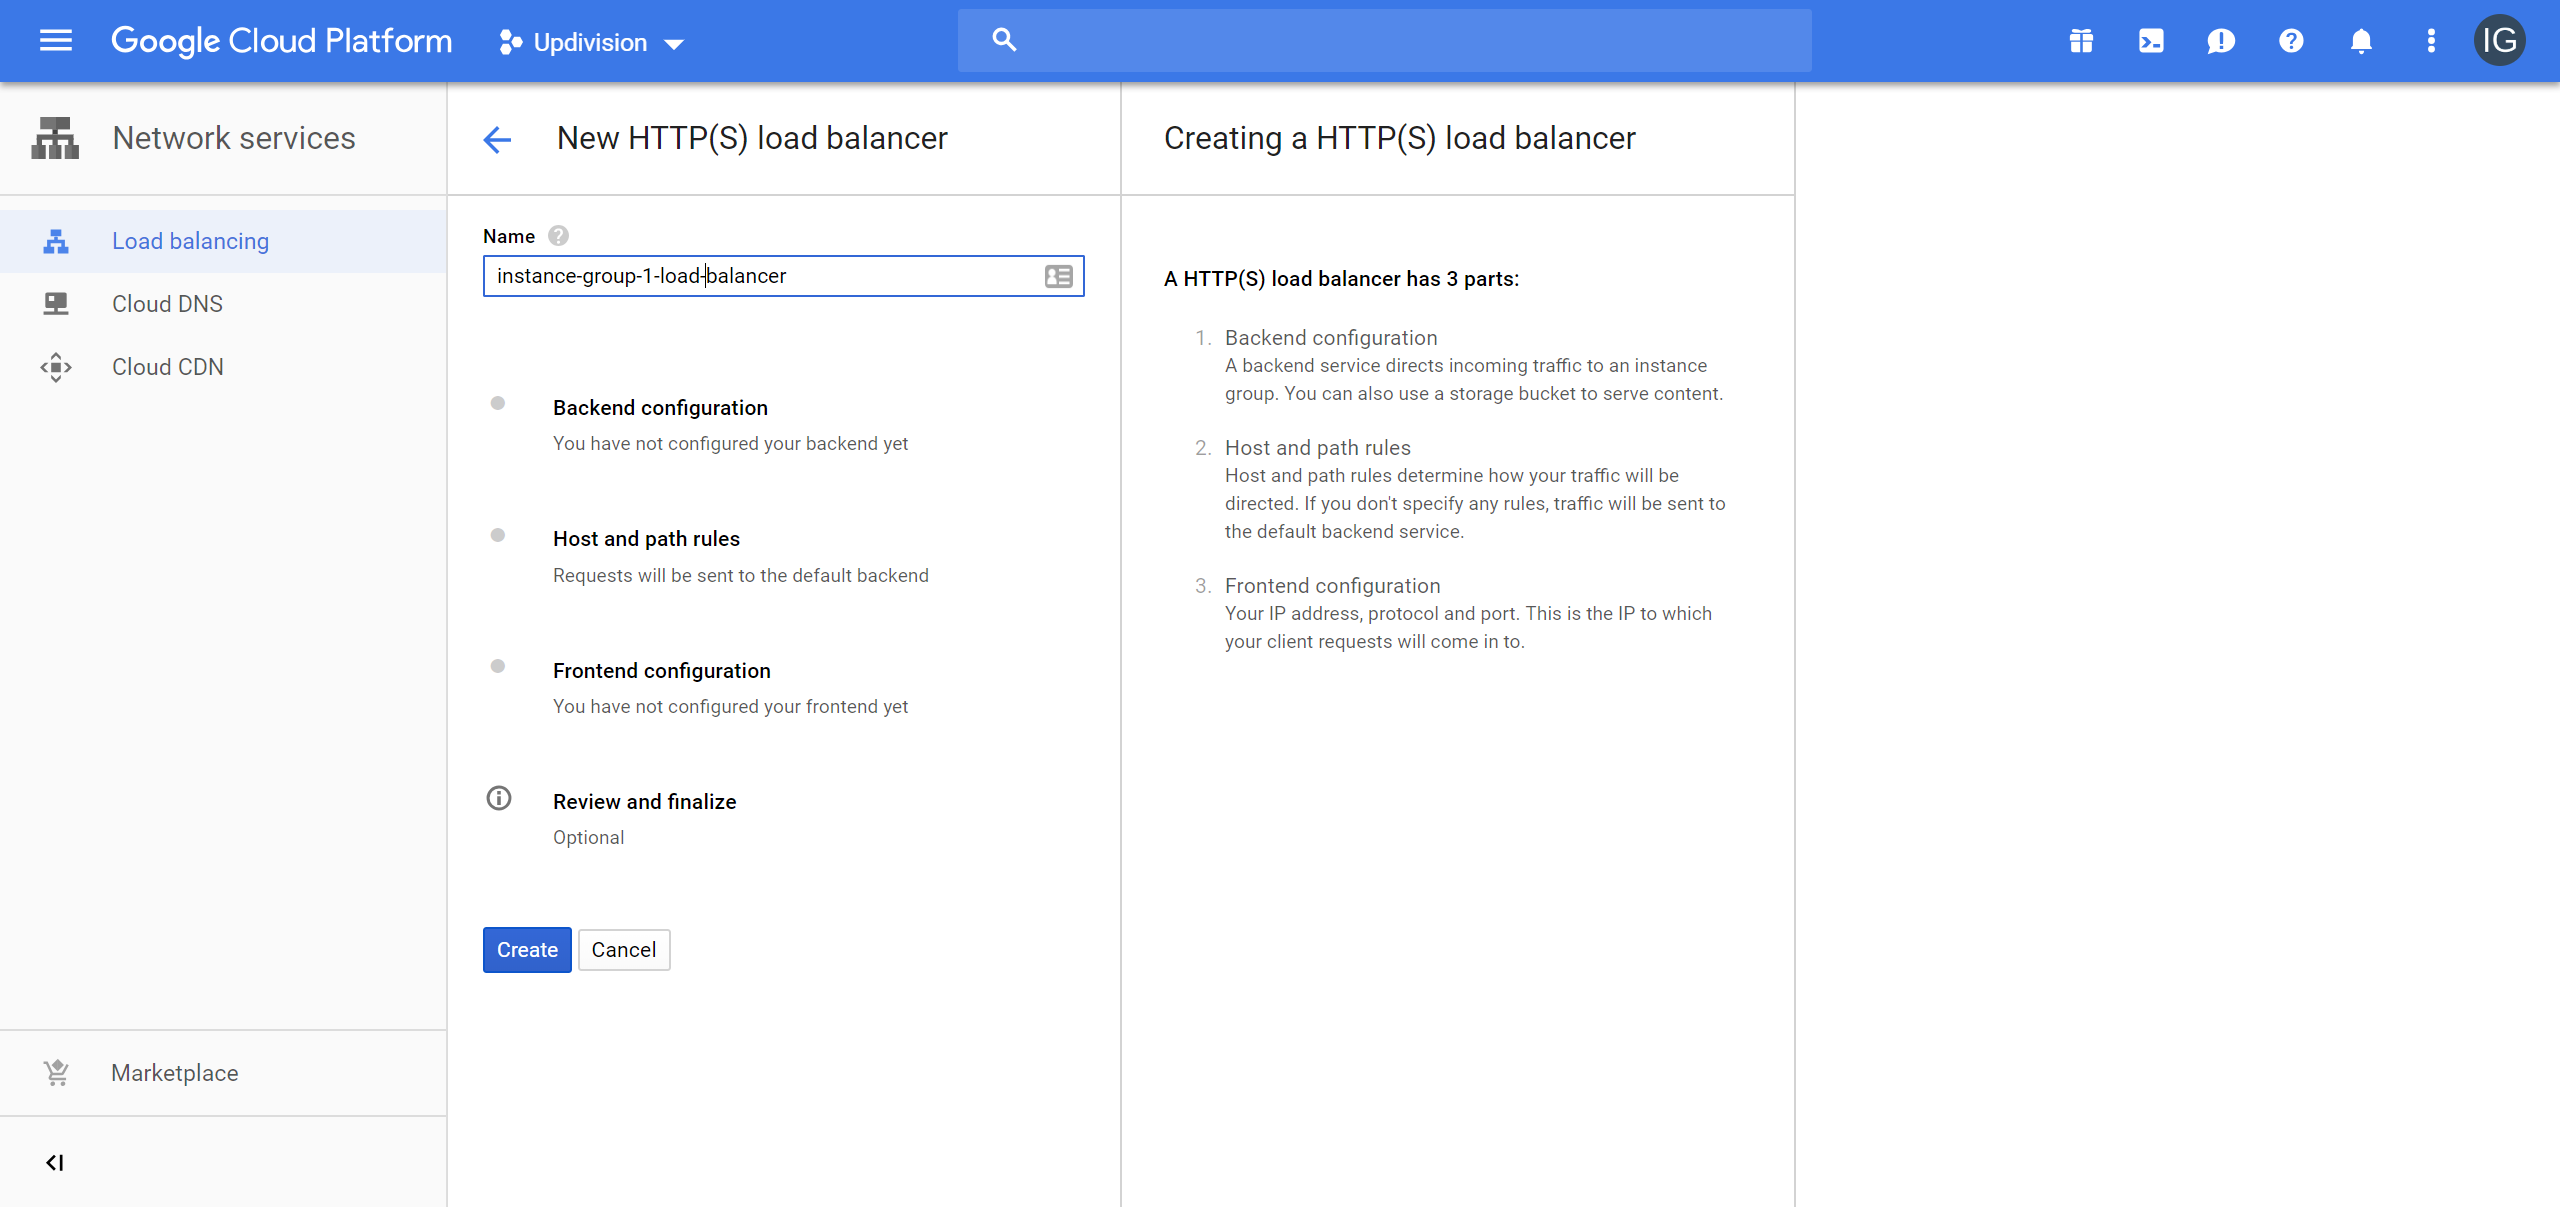
Choose Create backend services & backed buckets and choose Create backend service
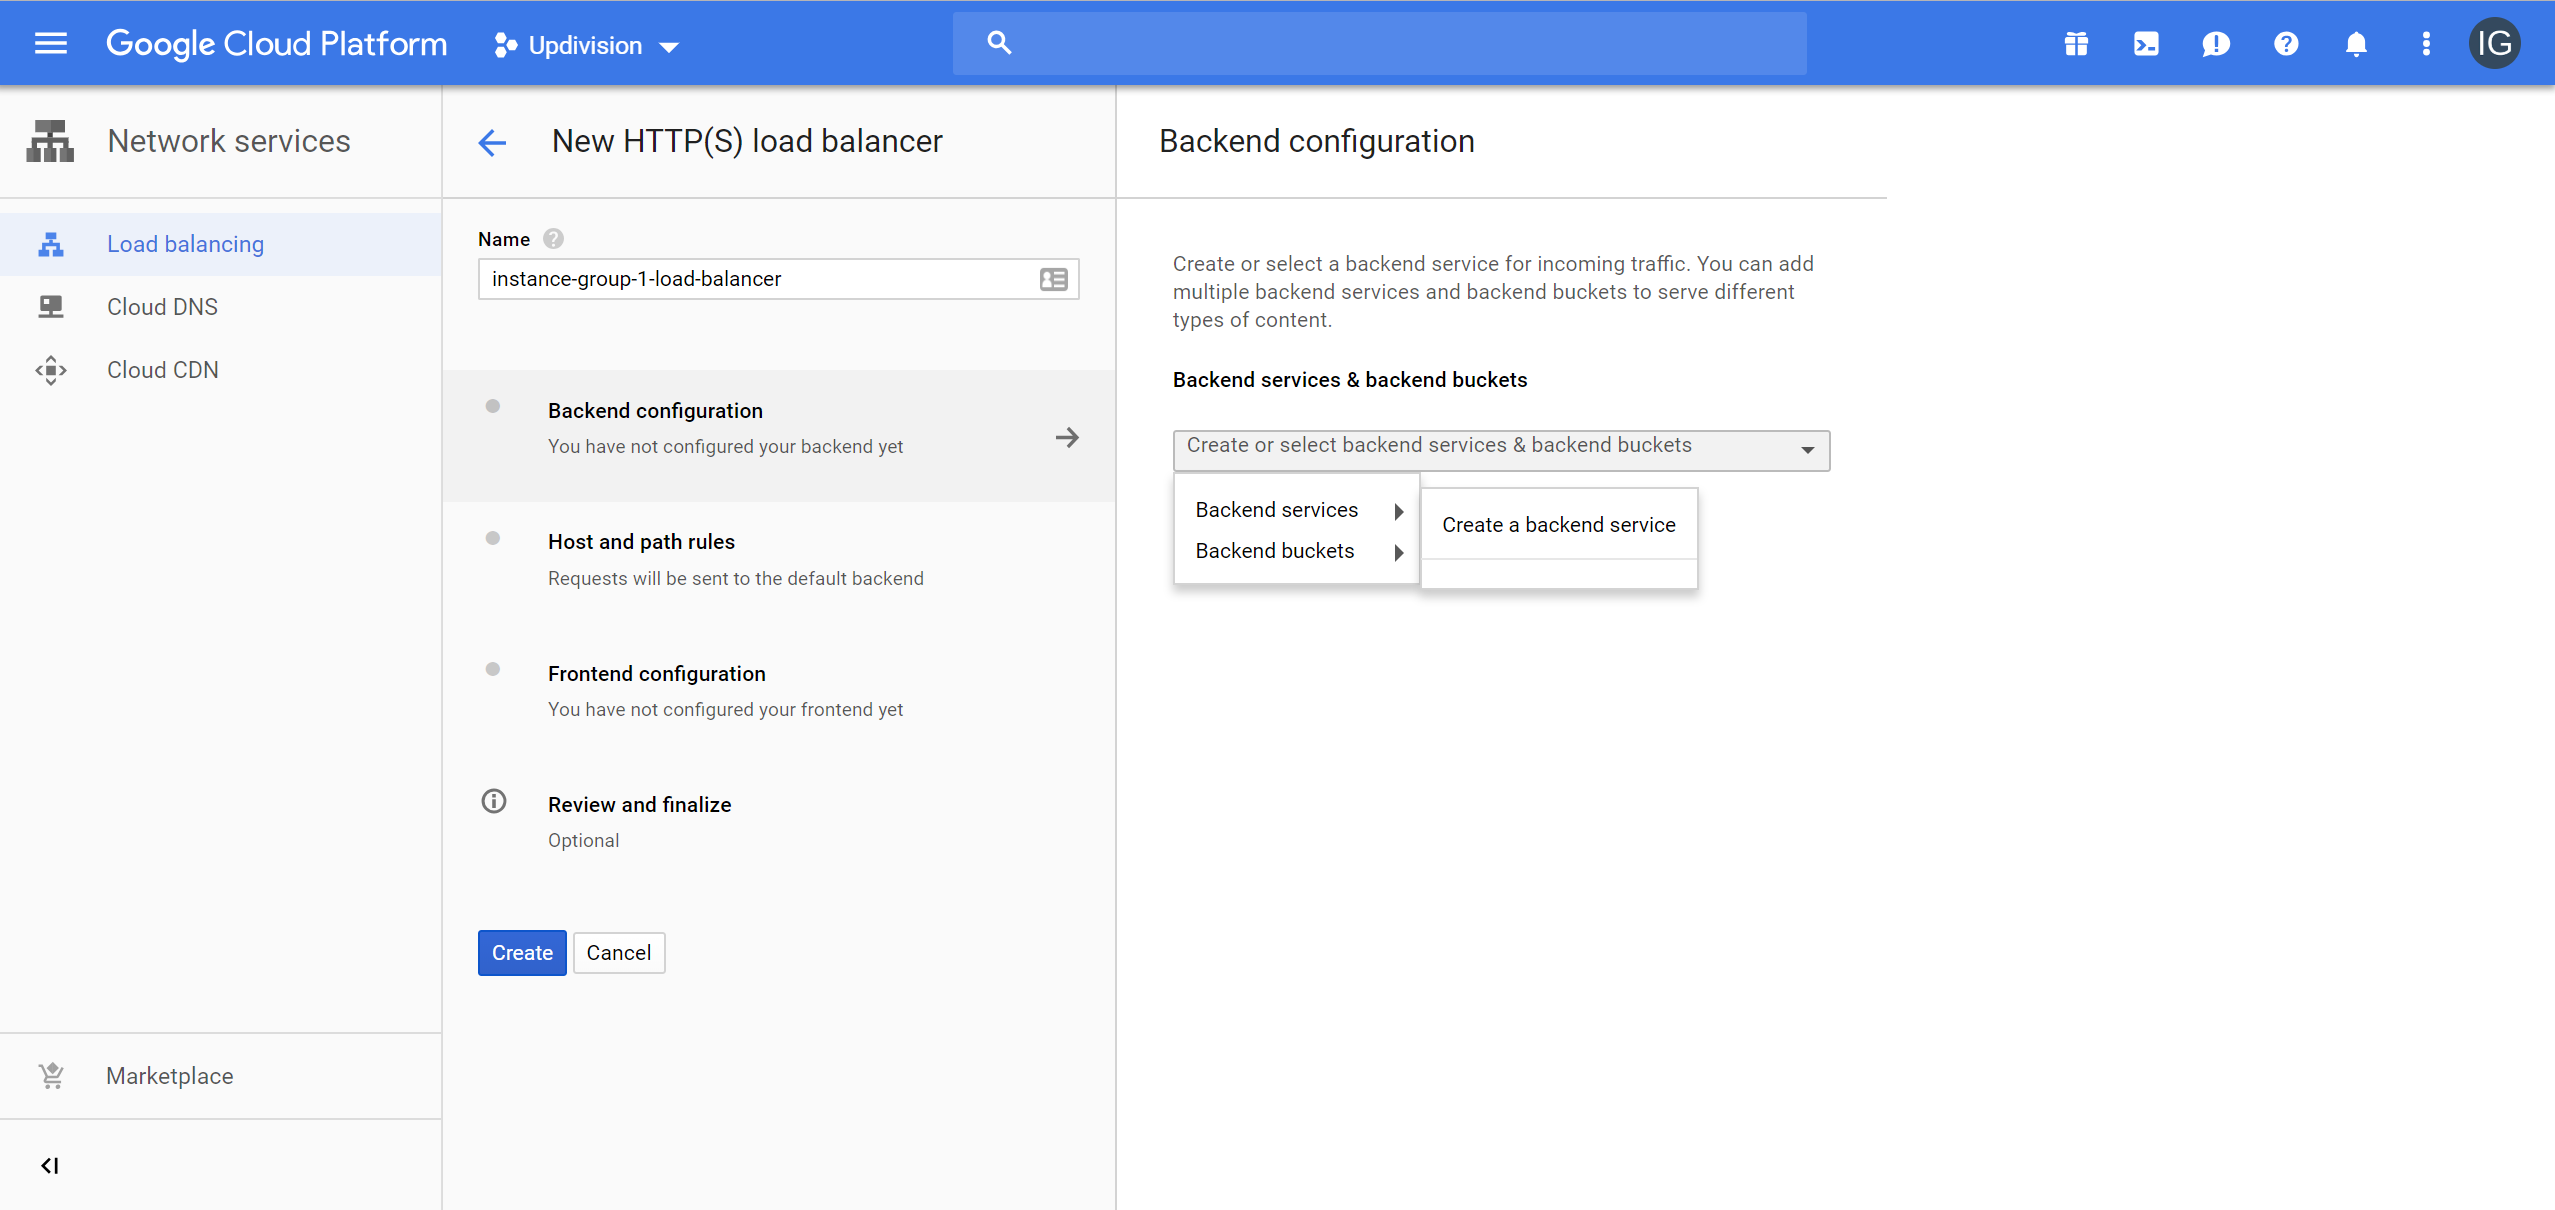
Give it a name, choose the instance group and edit the protocol to be https
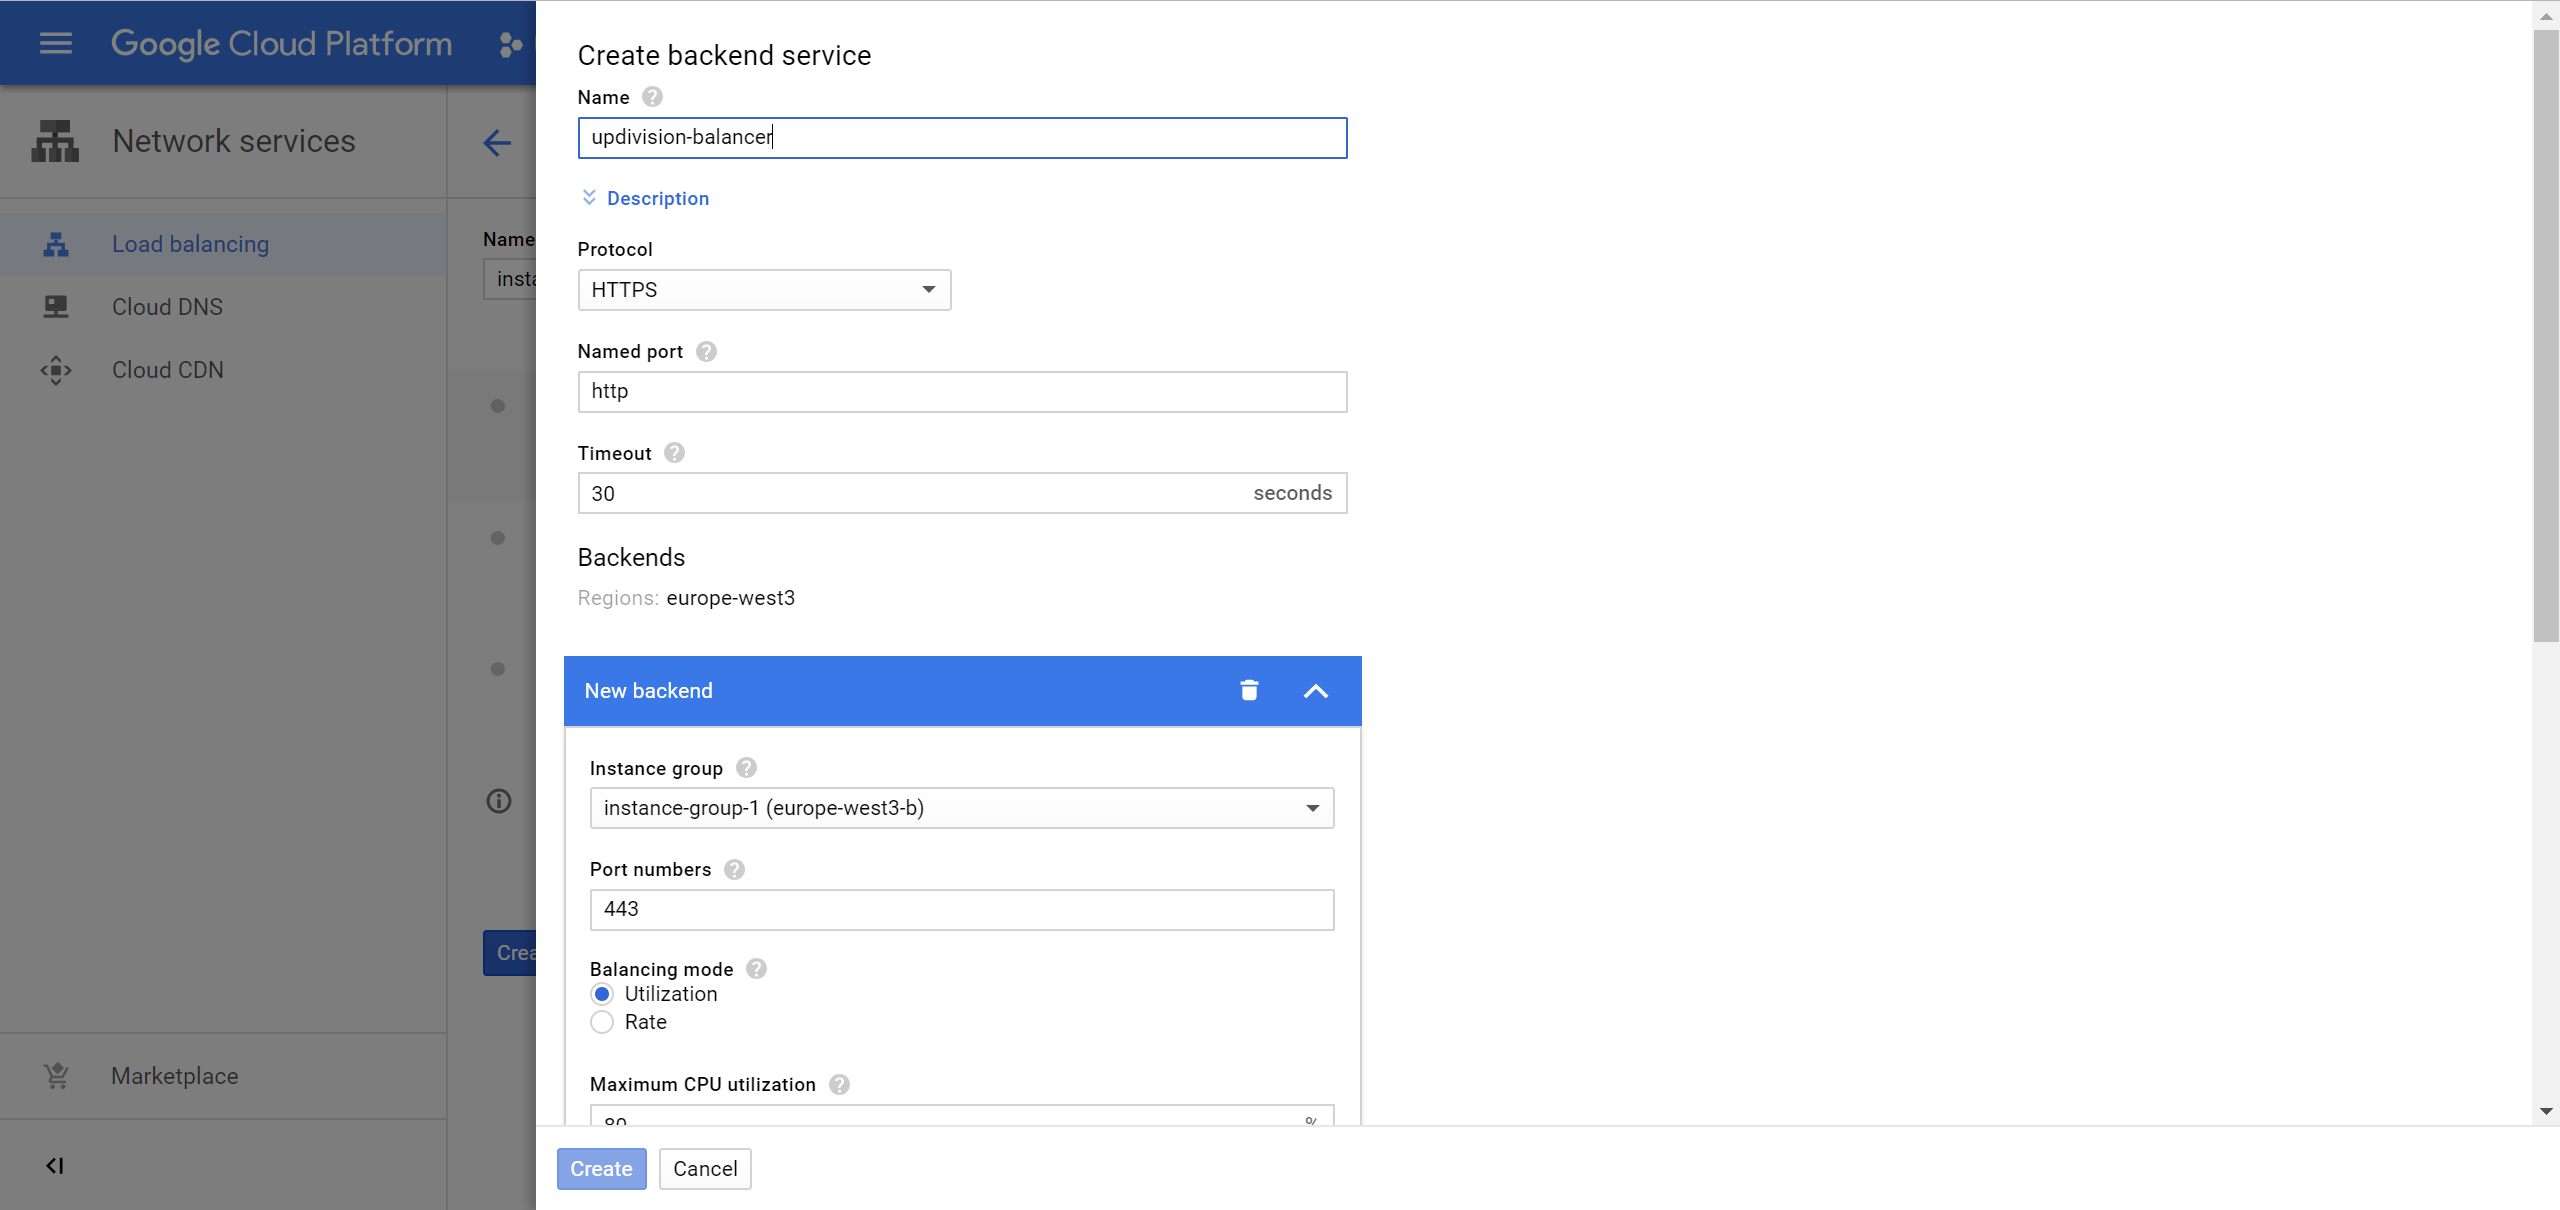
I also scrolled down and checked Enable Cloud CDN as well.
Before clicking create I needed to create a Health Check
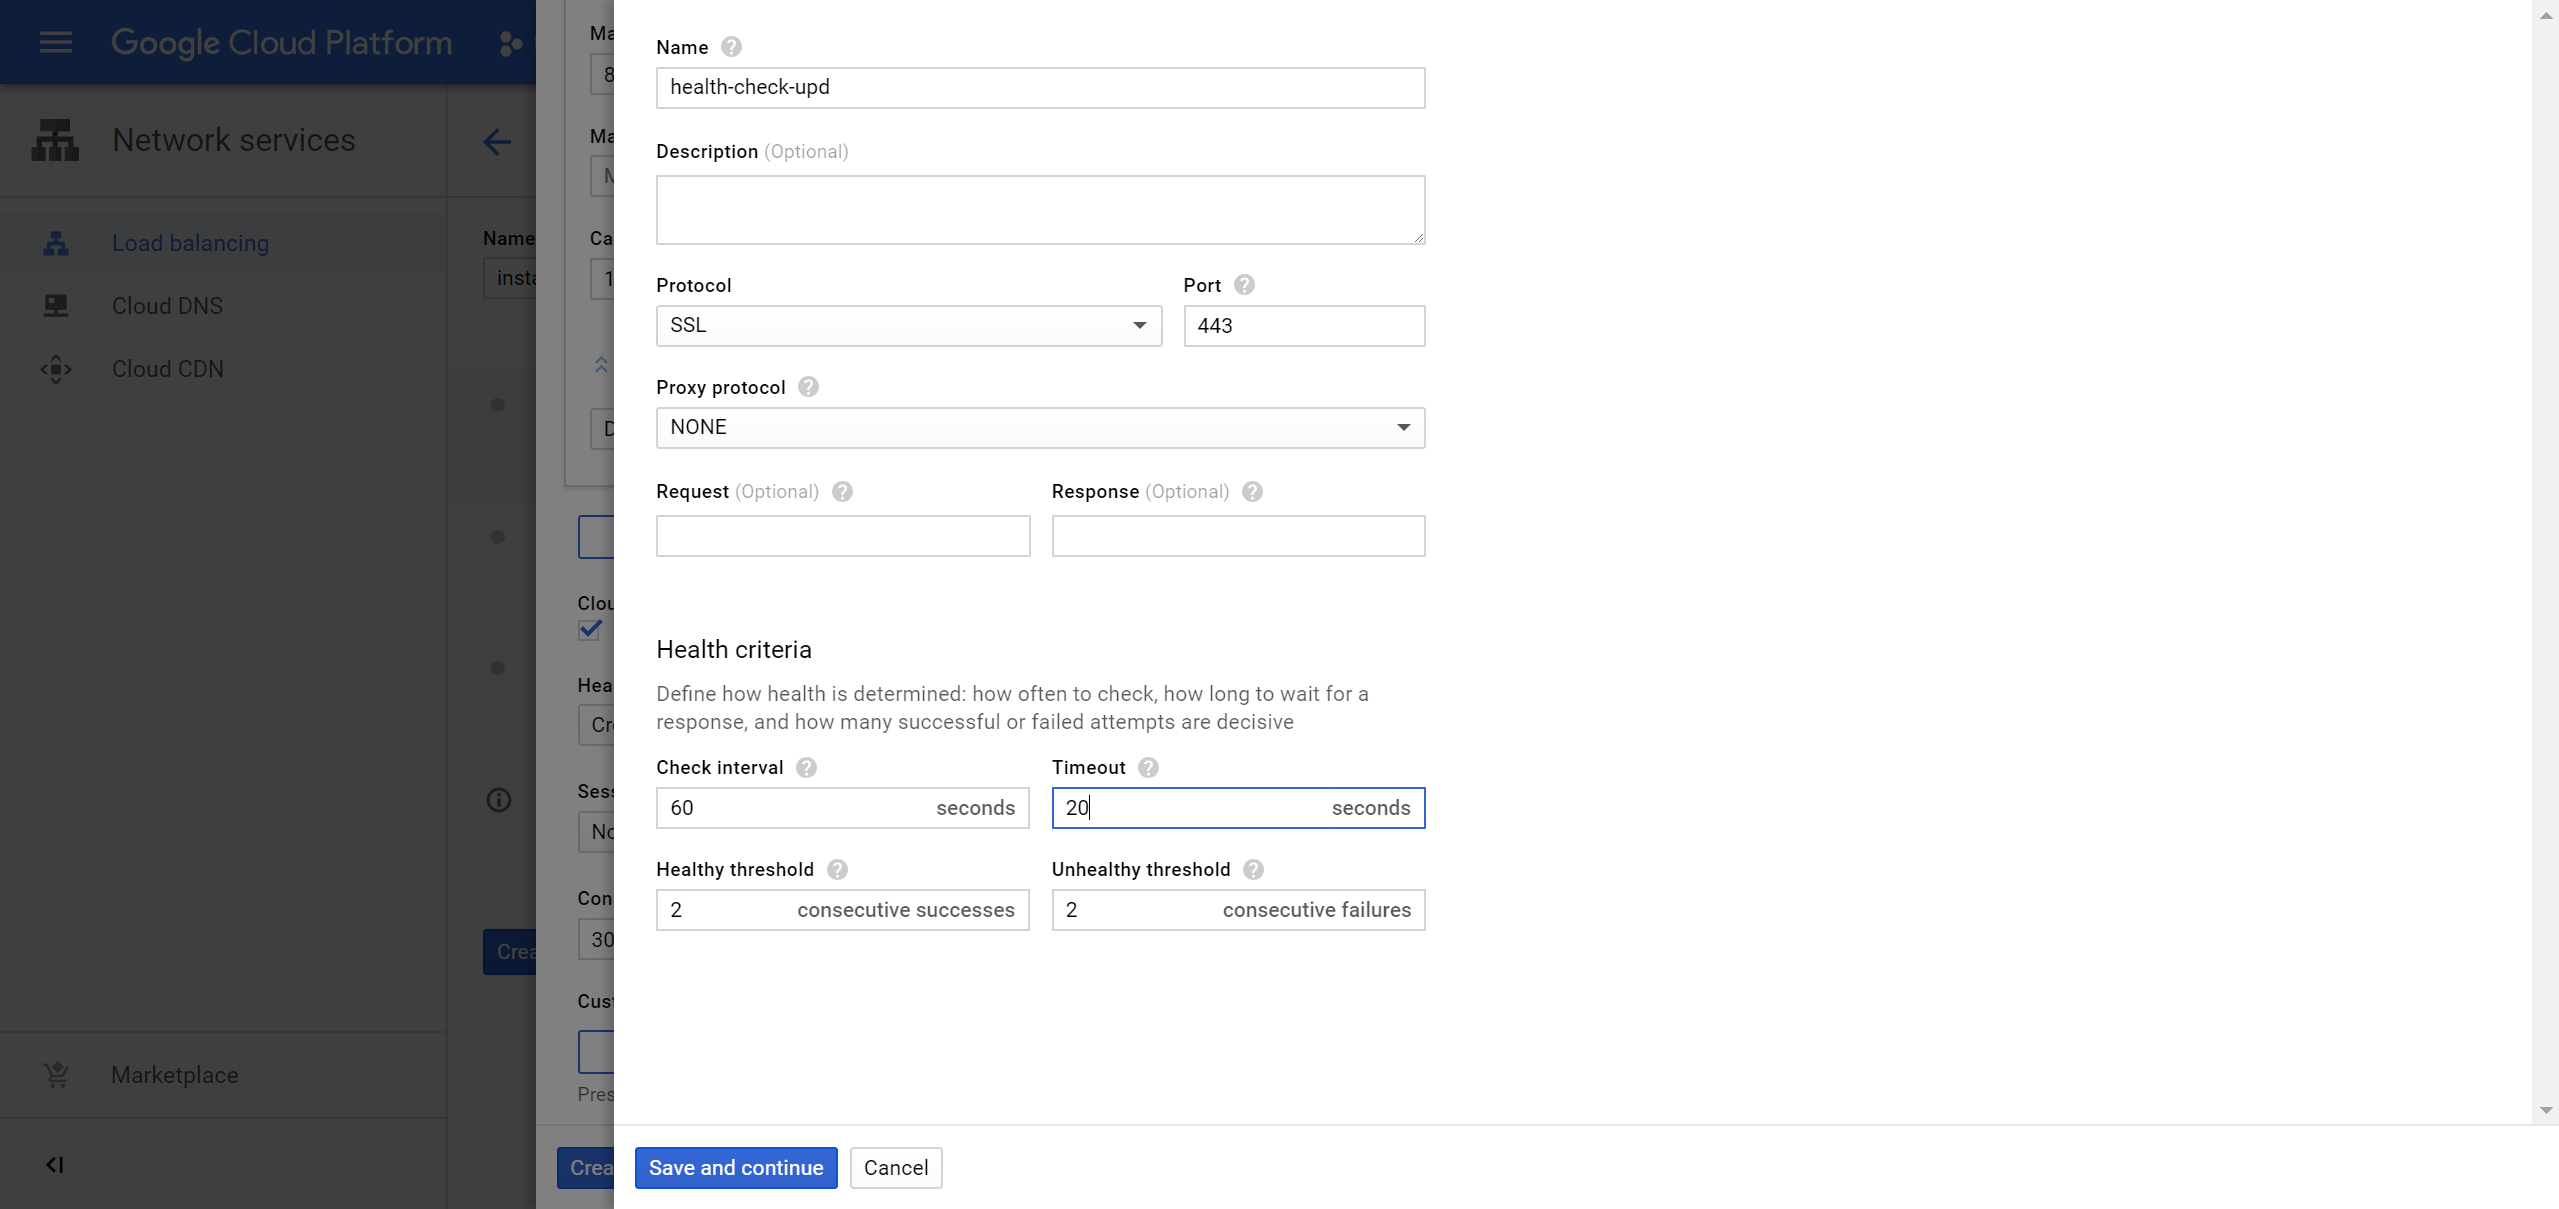
Click Save and Continue, then click Create.
In the first screen (will show up after you click create) I click Create.
You can also double check your setting by going to the official Google cloud page here: https://cloud.google.com/iap/docs/load-balancer-howto
That’s all for this tutorial.
I recommend reading all the Google documentation before starting on this path and making sure you have the setup planned. I had to delete my instances once because I didn’t plan it ahead of time.
Happy Laravel deployment!


